Mummy pizzas have become my absolute go-to for any Halloween celebration, and I’m so excited to share this recipe with you! I remember making these as a kid, the sheer delight of turning a simple snack into something spooky and fun. The smell of warm pizza dough mingling with sweet tomato sauce and gooey cheese is pure magic, especially when you’re crafting these adorable little guys. These are truly some of the most kid-friendly mummy pizzas you’ll ever make, perfect for little hands to help assemble. If you’re looking for creative mummy pizza ideas for Halloween, you’ve found a winner! Let’s get cooking!
Why You’ll Love This Mummy Pizza Recipe
You’re going to adore making these mummy pizzas for so many reasons! They’re a guaranteed hit with everyone:
- Incredible Taste: The classic pizza flavors you love, with a fun Halloween twist that makes them irresistible.
- Super Quick Prep Time: Ready to bake in under 20 minutes, making them perfect for busy weeknights or last-minute party snacks.
- Family-Friendly Fun: These are genuinely easy mummy pizzas that kids can help make, fostering creativity and kitchen confidence. You can learn more about cooking with kids on our about page.
- Budget-Friendly: Uses simple, common ingredients you likely already have, making them an affordable way to celebrate Halloween.
- Versatile: Great as an appetizer, a main meal, or a fun snack, these easy mummy pizzas fit any occasion.
- Spooky & Cute: The adorable mummy design is sure to impress and delight guests of all ages at your Halloween party.
- Customizable: Easily adapt the toppings to suit picky eaters or to create even more unique mummy pizza ideas for Halloween.
Ingredients for Easy Mummy Pizzas
Gather these simple items for your spooky creations. This mummy pizza dough comes together quickly, and using pre-made dough means less fuss and more fun. We’ll use 1 package pre-made pizza dough, which is fantastic for a quick recipe. For the base, you’ll need 1 cup pizza sauce – a classic marinara works perfectly. The gooey goodness comes from 1 ½ cups shredded mozzarella cheese, but feel free to swap in some cheddar or provolone for a different flavor. For the mummy bandages, mummy pizza with string cheese is a fantastic shortcut; simply cut pre-mozzarella string cheese into strips. You’ll also need black olives for the eyes, and you can use any leftover toppings like pepperoni or bell peppers for extra flavor. An 1 egg is needed for a shiny egg wash on the dough strips.
How to Make Mummy Pizzas
Let’s get started on assembling these adorable mummy pizzas! It’s a straightforward process, and you’ll be amazed at how quickly these spooky snacks come together. The aroma of baking pizza is always a winner, and this recipe is no exception.
- Step 1: First things first, preheat your oven to a nice hot 400°F (200°C). This ensures a crispy crust. Line a baking sheet with parchment paper; this makes cleanup a breeze and prevents sticking.
- Step 2: Take your pre-made pizza dough and roll it out on a lightly floured surface. Aim for a thickness of about 1/4 inch. This is where you have some creative freedom!
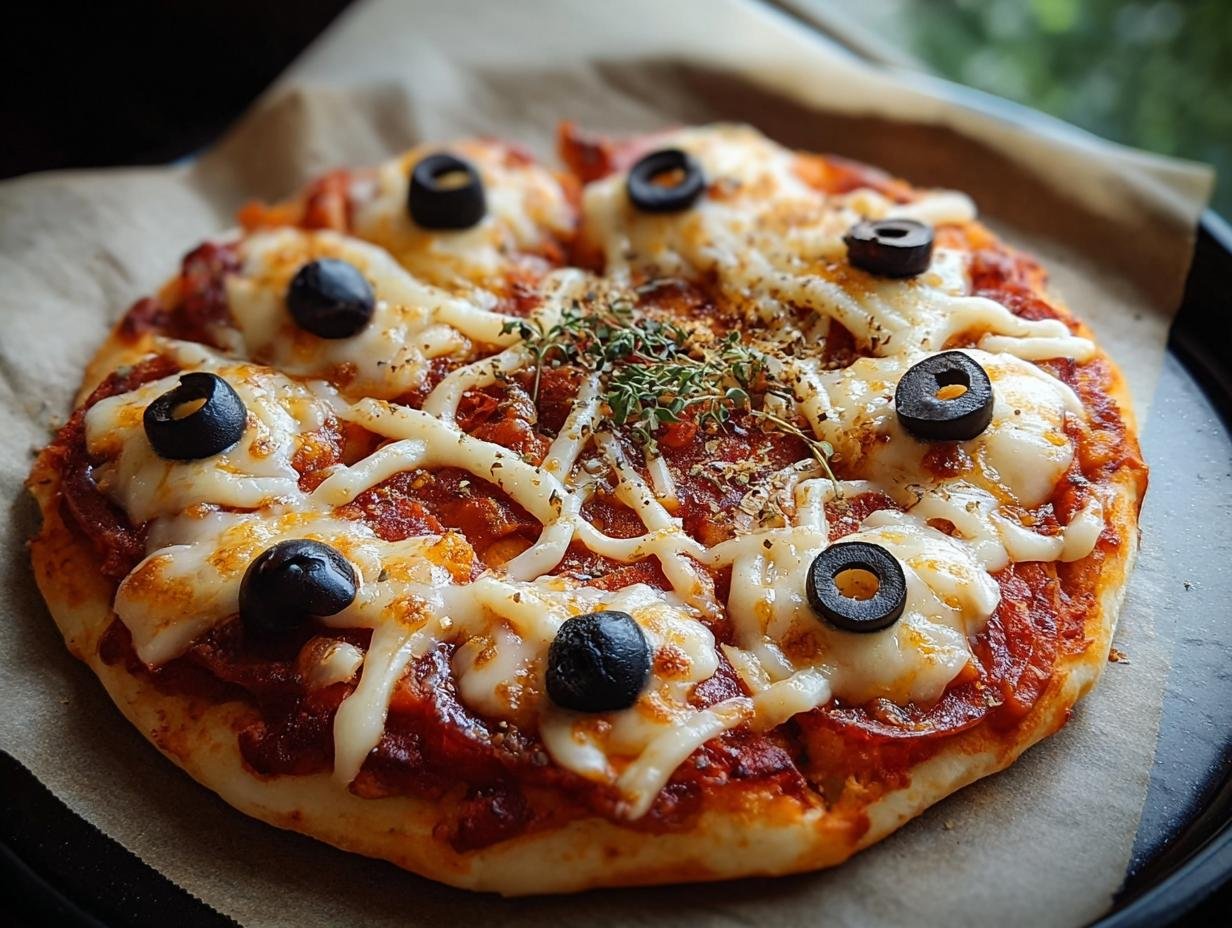
- Step 3: Cut your dough into shapes. Rectangles work great for classic mummies, or you can go for circles. This is part of the fun of how to make mummy pizzas!
- Step 4: Spread a thin layer of pizza sauce evenly over each dough piece, leaving a small border around the edges for the crust. Imagine you’re painting a spooky canvas!
- Step 5: Generously sprinkle the shredded mozzarella cheese over the sauce. This will melt into gooey, yummy goodness under the dough strips.
- Step 6: Now for the fun part – mummy pizza decoration! Arrange your chosen toppings like pepperoni slices, olives, or bell peppers. You can even use pepperoni for the mummy’s eyes if you like.
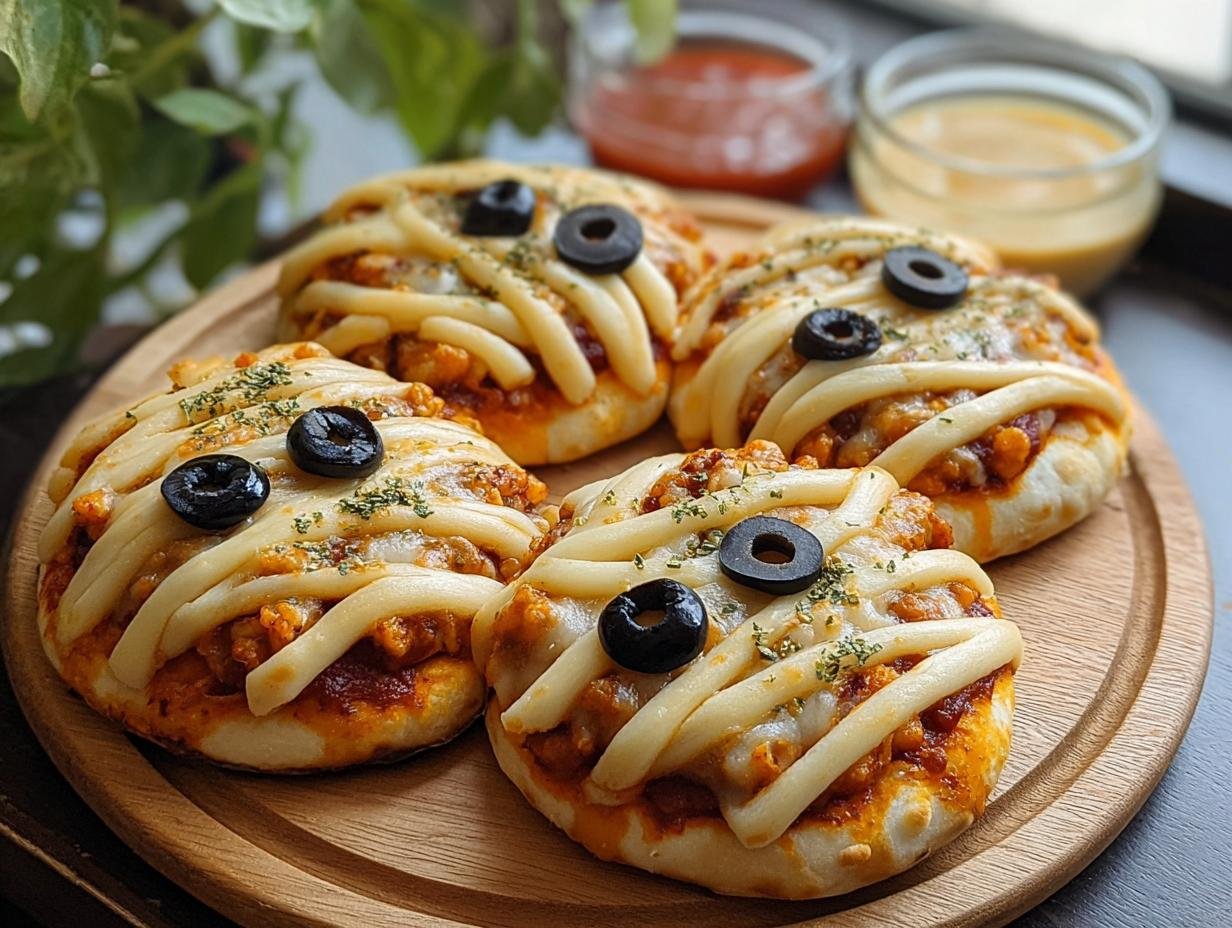
- Step 7: Using the remaining dough, cut thin strips to create the mummy bandage effect. Lay these strips across the pizza, overlapping them slightly to mimic bandages. This is a key part of the mummy pizza design.
- Step 8: In a small bowl, whisk together the 1 egg with a tiny splash of water. Brush this egg wash over the dough strips. This gives them a beautiful golden sheen as they bake.
- Step 9: Carefully place the baking sheet into the preheated oven. Bake for 15-20 minutes, or until the crust is golden brown and the cheese is melted and bubbly. Keep an eye on them to prevent burning.
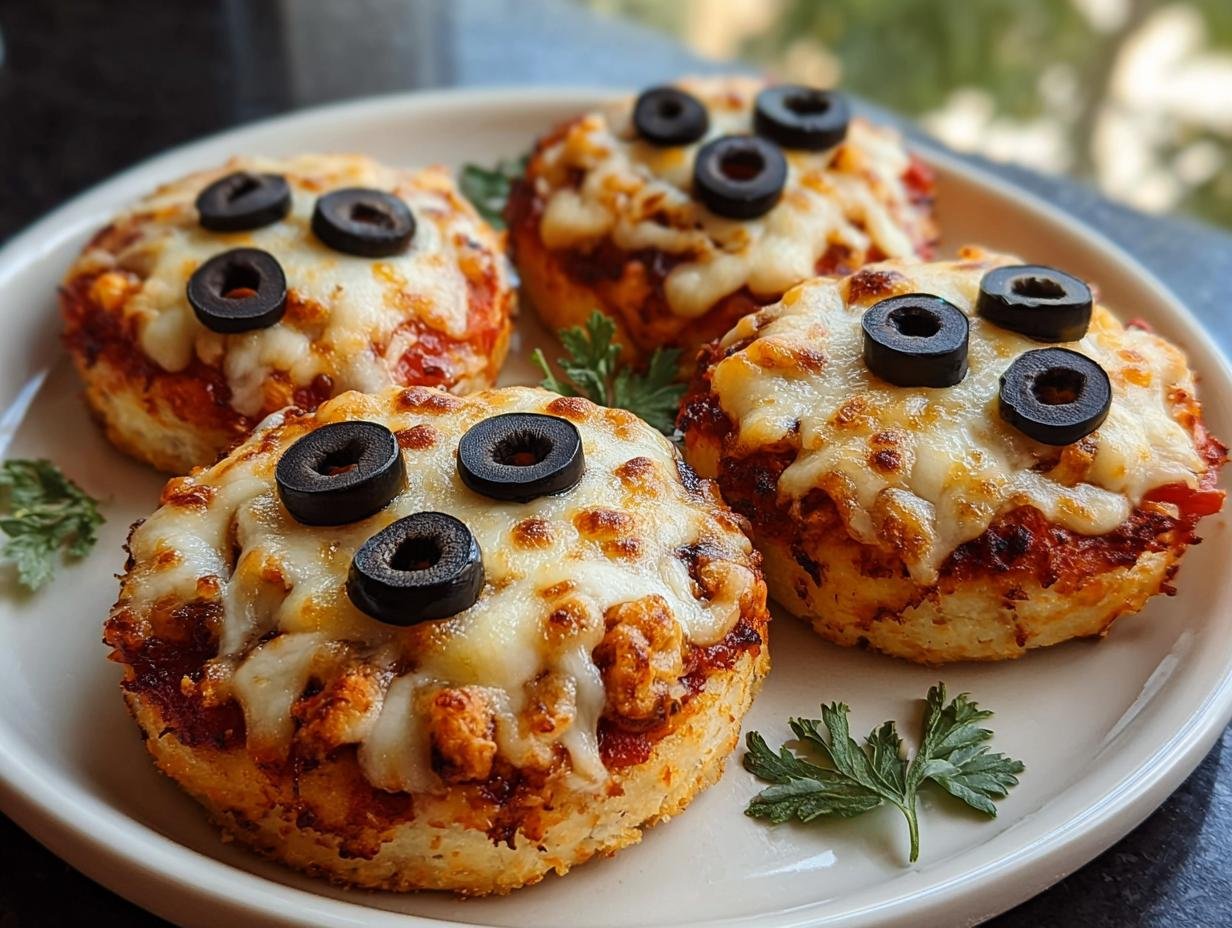
- Step 10: Once out of the oven, let the mummy pizzas cool for just a minute or two. Then, add two black olive slices for the mummy’s eyes. They’ll look so spooky and delicious!
Spooky Mummy Pizza Decoration Ideas
Elevate your mummy pizzas with these creative decoration tips! These aren’t just snacks; they’re edible art. Remember, the goal is to make them look like adorable, wrapped mummies. Don’t be afraid to get a little messy – that’s part of the fun!
- Bandage Technique: Cut your premade dough into thin strips. Lay them across the pizza in a crisscross pattern, leaving a small gap for the eyes. Overlap the strips slightly to give a layered mummy effect.
- Eye Placement: Use two black olive halves or slices for the mummy’s eyes. Place them strategically near the top of the pizza, peeking out from the bandages. You can even use a small dollop of cream cheese under the olives to help them stick.
- Topping Creativity: Beyond pepperoni and olives, consider using small pieces of bell peppers for a pop of color, or even small circles of sausage for a different look. The key is to integrate them subtly so the mummy bandages are the star.
- Cheese Melt: Ensure your mozzarella cheese is spread evenly under the dough strips. As it melts, it will help hold the bandage strips in place and add to the gooey, delicious appeal of your spooky mummy pizzas.
What are the best toppings for spooky mummy pizzas?
For the best flavor and appearance, I love using classic pizza toppings. Small, thin slices of mummy pizza with pepperoni work wonderfully for both flavor and as eyes. For the bandages, mummy pizza with olives can be used sparingly, but I find the dough strips are key. Consider small diced bell peppers for a touch of color beneath the cheese.
Can I use different types of mummy pizza dough?
Absolutely! While pre-made dough is quick, you can certainly use homemade pizza dough or even refrigerated biscuit dough or crescent roll dough for your mummy pizzas. If using biscuit dough, flatten each biscuit slightly before cutting into strips. These can be prepped ahead and stored in the fridge for a day. For more baking tips, check out our baking tips.
How do I avoid common mistakes when making mummy pizzas?
A common pitfall is over-saucing, which can make the dough soggy. Use a thin, even layer. Also, don’t make your bandage strips too thick; thinner strips bake better and look more like actual bandages. Lastly, ensure your oven is fully preheated to get that perfect golden-brown crust. You can find more information on proper oven temperatures at FoodSafety.gov.
Best Ways to Serve Mummy Pizzas for Kids Party
Making these mummy pizzas the star of your kids’ party is easy and fun! They’re perfect as a centerpiece for a Halloween buffet or as individual spooky snacks. For a truly festive spread, consider serving these alongside some “witch finger” pretzels or “ghost” meringues for a complete spooky theme. You can also make some slightly different, perhaps with extra olives for funny eyes, creating a whole cast of characters – these funny mummy pizzas are guaranteed to get giggles. They pair wonderfully with a simple green salad or some crunchy carrot sticks to balance the cheesy goodness.
Nutrition Facts for Mummy Pizzas
These fun mummy pizzas are a treat, and here’s a general idea of what you can expect per serving. Keep in mind that the exact nutritional values for your mummy pizzas will vary based on the specific ingredients and toppings you choose.
- Calories: Approximately 250-350 (will vary significantly based on dough, cheese, and toppings)
- Fat: 10-20g
- Saturated Fat: 4-8g
- Protein: 10-15g
- Carbohydrates: 30-45g
- Fiber: 2-4g
- Sugar: 5-10g
- Sodium: 400-700mg
Nutritional values are estimates and may vary based on specific ingredients used. For more details on nutritional information, you can consult MyFitnessPal.
Properly storing your delicious mummy pizzas ensures they stay tasty for later enjoyment. Once they’ve cooled completely – this is crucial to prevent sogginess – store them in an airtight container or wrap them well in plastic wrap and then foil. These make fantastic make-ahead mummy pizza snacks for lunches or impromptu gatherings. In the refrigerator, they’ll keep well for about 3 to 4 days. If you want to save them for even longer, you can freeze them for up to 3 months. They freeze beautifully, retaining that festive charm!
When you’re ready to reheat your mummy pizzas, you have a few great options. For a quick reheat, a toaster oven or a regular oven set to 350°F (175°C) for about 5-10 minutes works wonders, bringing back that crispy crust. If you’re in a real hurry, a microwave can do the trick, though the crust might be a bit softer. Just heat in 30-second intervals until warmed through. Either way, you’ll have a delightful spooky treat ready in no time! If you have any questions, feel free to contact us.
Frequently Asked Questions About Mummy Pizzas
What are mummy pizzas?
Mummy pizzas are a fun, spooky Halloween-themed appetizer or snack made by decorating mini pizzas to look like mummies. Typically, they use pizza dough or crescent roll dough cut into strips to mimic bandages, with black olives or other small toppings used for the mummy’s eyes. They’re a fantastic way to get creative in the kitchen during the fall season!
Why are they called mummy pizzas?
They’re called mummy pizzas because of their distinctive appearance. The strips of dough wrapped around the pizza base, along with two strategically placed “eyes” (usually olives), strongly resemble the ancient, bandaged figures we know as mummies. It’s a playful name that perfectly captures the festive Halloween spirit of this dish!
Can I make mummy pizzas ahead of time?
You can definitely assemble the mummy pizzas ahead of time. Prepare them up to the point of baking, cover them tightly with plastic wrap, and refrigerate for up to 24 hours. When you’re ready to bake, just pop them into the preheated oven, adding a few extra minutes to the cooking time since they’ll be starting from cold. This makes them a great option for party prep! For more party planning tips, you might find our author’s other recipes helpful.
What are the best mummy pizza ideas for Halloween?
Beyond the classic dough strips, consider using leftover crescent roll dough for a flakier texture, or even cutting shapes from cheese slices to act as bandages for a cheesy variation. You can also experiment with different toppings for the eyes, like small pieces of pepperoni or even tiny bits of bell pepper. Making a variety of sizes, from mini personal pizzas to larger ones cut into squares, also adds to the mummy pizza fun!
Variations of Mummy Pizzas You Can Try
Once you’ve mastered the basic mummy pizza recipe, you’ll want to explore these fun variations! They’re all fantastic for parties and offer a slightly different twist on the classic. Try a gluten-free version by using your favorite gluten-free pizza dough or even large gluten-free crackers as a base for a delightful mummy pizza appetizer. For a quicker approach, consider using refrigerated crescent roll dough; simply unroll, cut strips, and proceed as usual for a lighter, flakier bandage. You can also play with flavors by adding a sprinkle of garlic powder or Italian seasoning to the dough strips before baking, or by using a pesto or white sauce instead of traditional pizza sauce for a different taste profile in your spooky mummy pizzas.
PrintMummy Pizzas: 10 Spooky Halloween Delights

Mummy Pizzas are a fun and creative Halloween-themed twist on classic pizza, perfect for kids and adults. This easy recipe features a spooky mummy appearance with gooey cheese and savory toppings, making it a delightful addition to any festive gathering.
- Prep Time: 20 minutes
- Cook Time: 15-20 minutes
- Total Time: 35-40 minutes
- Yield: Varies based on dough size
- Category: Appetizer
- Method: Baking
- Cuisine: American
- Diet: Vegetarian
Ingredients
- 1 package pre-made pizza dough
- 1 cup pizza sauce
- 1 ½ cups shredded mozzarella cheese
- 1 cup assorted toppings (pepperoni, olives, bell peppers)
- 1 egg
- 1 teaspoon garlic powder (optional)
- Salt and pepper to taste
- Black olives (for eyes)
Instructions
- Preheat oven to 400°F (200°C). Line a baking sheet with parchment paper.
- Roll out pizza dough on a floured surface to 1/4 inch thickness.
- Cut dough into rectangles or circles for your mummy pizzas.
- Spread pizza sauce on each dough piece, leaving a border.
- Sprinkle mozzarella cheese over the sauce.
- Arrange your chosen toppings and use pepperoni for eyes if desired.
- Use strips of remaining dough to create bandage patterns.
- Whisk egg with a splash of water for the egg wash and brush over the dough bands.
- Bake for 15-20 minutes until crust is golden and cheese is bubbly.
- Add black olives for eyes once the mummy pizzas are out of the oven. Let cool slightly.
Notes
- For a crispier crust, use a preheated pizza stone.
- Experiment with different cheeses like cheddar or provolone for added flavor.
- Involve children in the preparation process for a fun family activity.
Nutrition
- Serving Size: 1 pizza
- Calories: Varies
- Sugar: Varies
- Sodium: Varies
- Fat: Varies
- Saturated Fat: Varies
- Unsaturated Fat: Varies
- Trans Fat: Varies
- Carbohydrates: Varies
- Fiber: Varies
- Protein: Varies
- Cholesterol: Varies


Leave a Reply