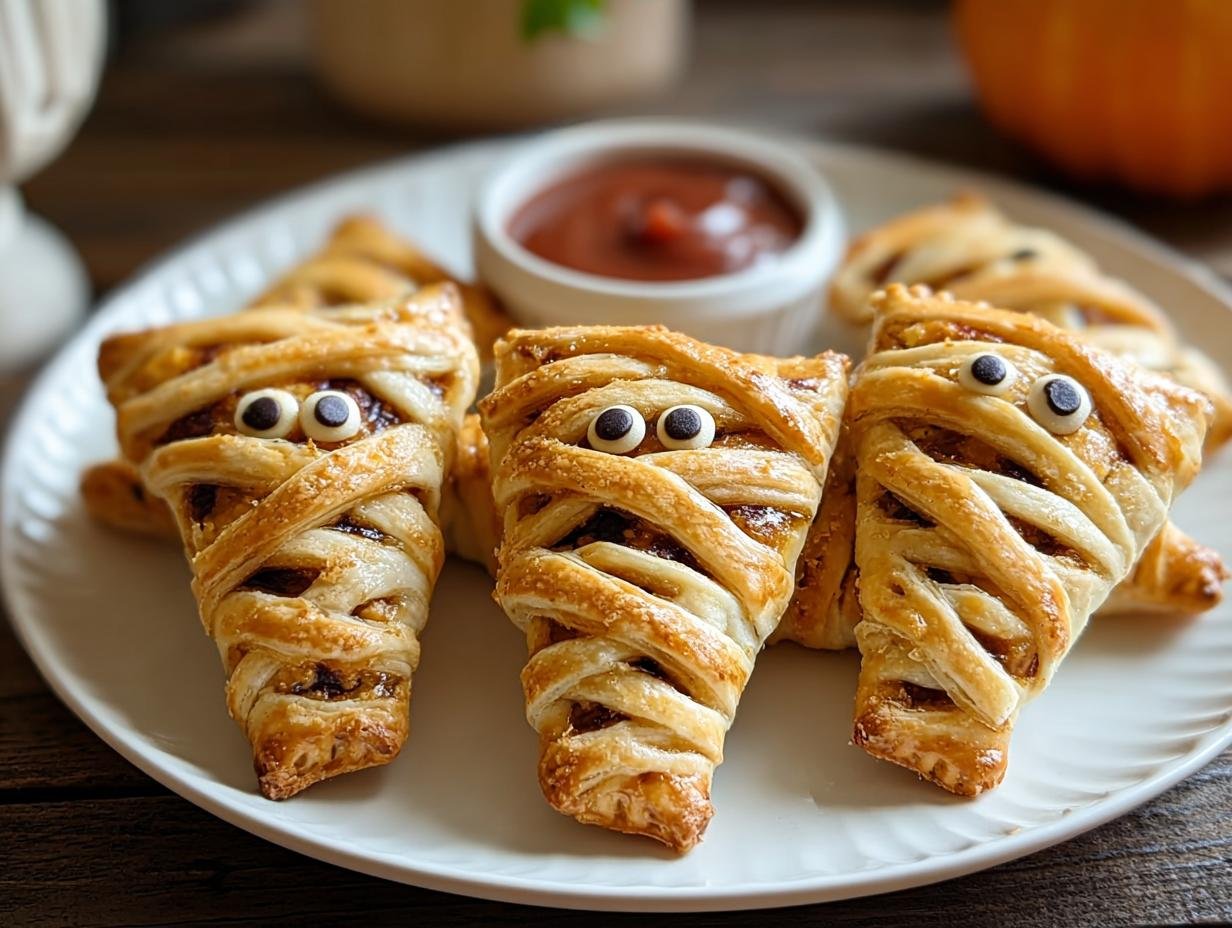
Mummy Hand Pies have been a Halloween tradition in my family for years, transforming simple crescent rolls into something truly magical and spooky. I remember the first time I made them with my kids; their eyes lit up with excitement as we rolled out the dough and carefully crafted the “bandages.” The smell of warm pastry and sweet chocolate hazelnut filling wafting from the oven is pure Halloween magic. These aren’t just treats; they’re edible works of art that bring everyone together. If you’re looking for a fun, easy, and totally delicious Halloween dessert hand pies, you’ve come to the right place. Let’s get baking these spooky delights!
Why You’ll Love This Mummy Hand Pie Recipe
Get ready for some Halloween fun! These Mummy Hand Pies are a guaranteed hit for parties, class treats, or just a cozy night in. Here’s why you’ll adore making them:
- Incredibly Easy to Make: Seriously, these are some of the most easy mummy hand pies you’ll ever whip up, perfect for busy bakers.
- Kid-Friendly Fun: Children will have a blast helping to create the mummy designs, making them truly kid-friendly mummy hand pies.
- Customizable Fillings: Swap the chocolate hazelnut spread for your favorite fruit preserves, cream cheese, or even pumpkin pie filling.
- Quick Preparation: With pre-made crescent roll dough, you can have these spooky treats ready in under an hour.
- Festive Presentation: Their adorable mummy shape makes them a standout addition to any Halloween spread.
- Deliciously Sweet: The combination of flaky pastry and sweet filling is irresistible.
- Minimal Mess: These hand pies are self-contained, making for a cleaner eating experience.
- Perfect for Sharing: They’re individually portioned and easy to hand out at parties or to trick-or-treaters.
Ingredients for Mummy Hand Pies
Gathering your supplies for these spooky Mummy Hand Pies is half the fun! We’re keeping it simple with readily available ingredients to make your mummy pie crust and filling a breeze. Here’s what you’ll need for this mummy pie filling and the adorable mummy design:
- 1 package (8 oz) refrigerated crescent roll dough – This is the base for our ghostly mummy shape and provides that classic flaky texture.
- 1 cup chocolate hazelnut spread – This rich, creamy spread makes for a delicious and easy mummy pie filling. Feel free to substitute with your favorite fruit preserves or cream cheese mixture!
- 1 large egg – Beaten, this egg wash is key to achieving that beautiful golden-brown color on your mummy pastry.
- 1/4 cup powdered sugar – For creating a simple, sweet icing to hold the mummy’s eyes and add an extra touch of sweetness.
- 1 tablespoon milk – Mixed with the powdered sugar, this helps create the perfect drizzling consistency for our icing.
- 1 teaspoon vanilla extract – A little splash adds a lovely aroma and flavor to the icing.
- Mini chocolate chips – These are perfect for giving our mummies their spooky eyes!
We’re about to dive into the fun part: assembling and baking these delightful Mummy Hand Pies! This section will guide you through each step, ensuring your homemade mummy pies turn out perfectly spooky and delicious. Follow along and get ready to create some magic in your kitchen as we show you exactly how to make mummy hand pies that will wow everyone.
Step-by-Step Tutorial
Prepare the Dough and Filling
- Step 1: Let’s get started by preheating your oven to 375°F (190°C). Line a baking sheet with parchment paper for easy cleanup and to prevent sticking.
- Step 2: Gently unroll the refrigerated crescent roll dough onto a clean, lightly floured surface. Press down on the seams with your fingers to fuse them together, creating one large, connected sheet of dough.
- Step 3: Using a knife or pizza cutter, cut the dough into approximate 4×3 inch rectangles. You want them large enough to fold over and seal securely.
- Step 4: Spoon about one tablespoon of your chosen chocolate hazelnut spread (or other mummy pie filling) into the center of each dough rectangle. Be sure to leave a small border around the edges so the filling doesn’t ooze out when sealed.
- Step 5: Fold the dough over the filling to create a pocket, like a mini turnover. Pinch the edges firmly together with your fingers to seal them completely. This step is crucial for keeping that yummy filling inside.
Create the Mummy Design
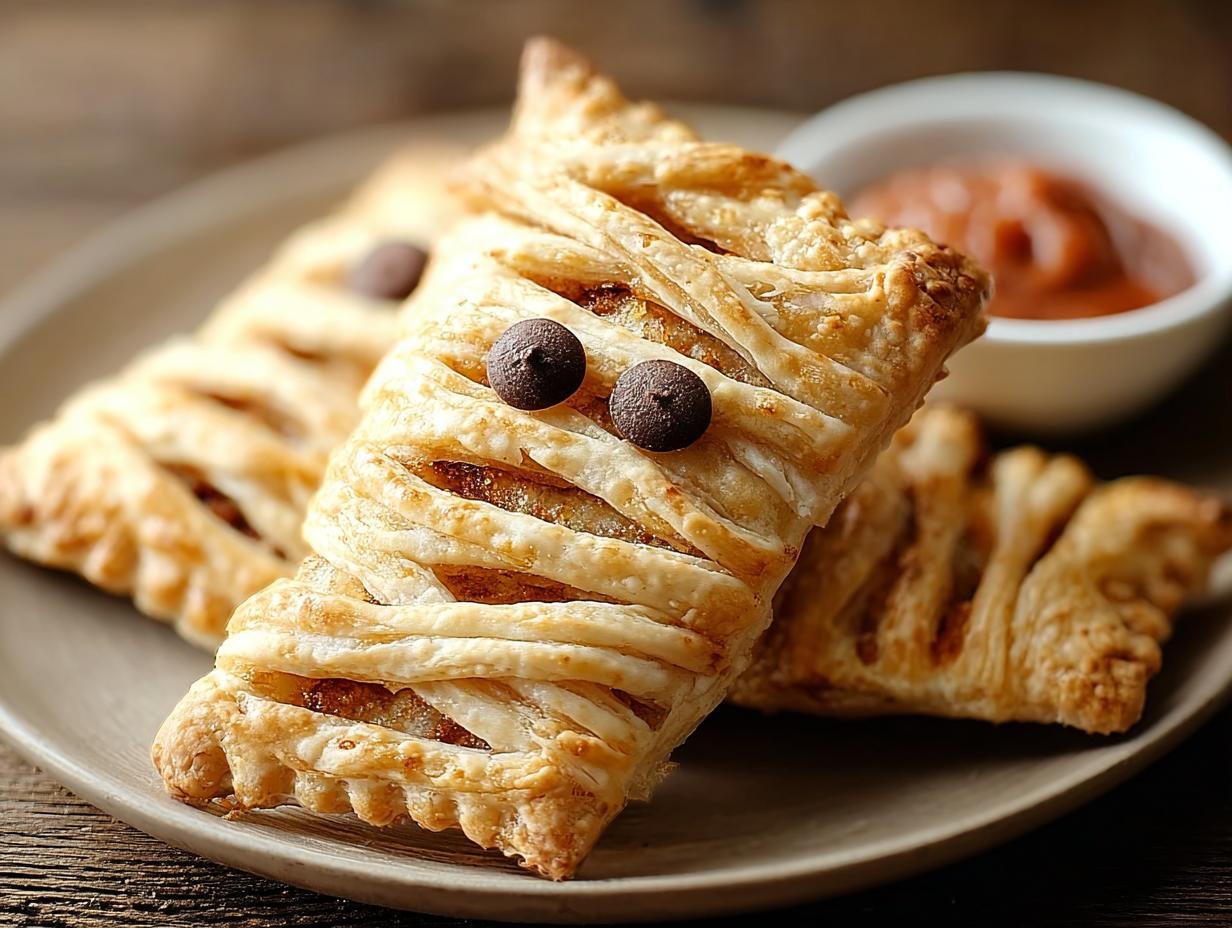
- Step 6: Now for the fun, mummy-making part! Take the leftover dough scraps. Use a small knife or pizza cutter to slice thin strips, about 1/4 to 1/2 inch wide. These will be your mummy’s bandages.
- Step 7: Carefully lay these dough strips crisscross over the top of each hand pie. Overlap them slightly to create the classic mummy bandage look. Gently press the ends of the strips onto the pie to secure them.
Bake and Decorate
- Step 8: In a small bowl, whisk one large egg until it’s smoothly beaten. Use a pastry brush to lightly coat the entire surface of each mummy hand pie with the egg wash. This will give them a beautiful golden-brown sheen as they bake.
- Step 9: Carefully transfer the prepared mummy hand pies to the parchment-lined baking sheet. Bake for 15-20 minutes, or until the pastry is puffed up and gloriously golden brown. The kitchen will start smelling amazing!
- Step 10: Once baked, remove the hand pies from the oven and let them cool on the baking sheet for about 5-10 minutes. This allows them to firm up slightly before decorating.
- Step 11: While the pies are cooling, prepare your simple icing. In another small bowl, whisk together the powdered sugar, milk, and vanilla extract until you have a smooth, drizzle-able consistency. Add a tiny bit more milk or powdered sugar if needed to get it just right.
- Step 12: Drizzle the icing back and forth over the cooled hand pies to mimic more bandages, creating that signature mummy look. Immediately after drizzling, place two mini chocolate chips on each pie to serve as their spooky eyes. These homemade mummy pies are now ready to be enjoyed!

Pro Tips for the Best Mummy Hand Pie Recipe
Want to elevate your spooky treats? These little tips will ensure your Mummy Hand Pies are the star of any Halloween gathering. They’re simple tricks that make a big difference in taste and appearance, making this the best mummy hand pie recipe around.
- For the flakiest crust, ensure your refrigerated crescent roll dough is cold when you start.
- Don’t overfill the pies; too much filling can cause them to burst during baking.
- Press the dough seams together firmly to prevent any leaks.
- Use a sharp knife for clean bandage strips; dull knives can tear the dough.
- Let the pies cool slightly before icing so the icing doesn’t melt off.
What’s the secret to perfect mummy hand pies?
The secret to truly perfect mummy hand pies lies in a few key details: ensuring the dough seams are sealed tightly, using just the right amount of filling, and achieving that golden-brown bake. This makes for a delightful texture and flavor combination. For more baking insights, check out our baking philosophy.
Can I make mummy hand pies ahead of time?
Yes, you can prepare the unbaked mummy hand pies up to 24 hours in advance. Assemble them completely, cover them loosely with plastic wrap, and refrigerate. You might need to add a few extra minutes to the baking time if they are going into the oven cold.
How do I avoid common mistakes with mummy hand pies?
A common pitfall is overfilling, which leads to messy leaks. Another mistake is not sealing the edges properly. Finally, be gentle when applying the bandages; tearing the dough can make the mummy design look messy. For more tips on avoiding baking mishaps, you can consult our disclaimer page.
Best Ways to Serve Mummy Hand Pies
These adorable Mummy Hand Pies are fantastic on their own, but they truly shine when presented as part of a larger Halloween celebration. They fit perfectly into any collection of spooky dessert recipes, adding a touch of playful fright to your spread. For a delightful treat, serve them warm with a scoop of vanilla bean ice cream; the contrast of warm pie and cold ice cream is simply divine. They also pair wonderfully with a glass of cold milk for the kids or a spiced apple cider for the adults. Imagine a dessert table filled with these little guys alongside pumpkin cookies and ghost cupcakes – pure Halloween magic! If you need help with party planning, consider reaching out via our contact page.
Nutrition Facts for Mummy Hand Pies
When you’re enjoying these fun Mummy Hand Pies, it’s helpful to have an idea of their nutritional breakdown. Keep in mind that the exact values can vary significantly based on the brand of crescent roll dough used and, most importantly, the type of filling and icing you choose. For more information on how ingredients affect nutrition, you can explore resources on nutrition.gov.
- Serving Size: 1 pie
- Calories: Varies based on filling and dough
- Fat: Varies based on dough and filling
- Saturated Fat: Varies based on dough and filling
- Protein: Varies based on dough and filling
- Carbohydrates: Varies based on dough and filling
- Fiber: Varies based on filling
- Sugar: Varies based on filling and icing
- Sodium: Varies based on dough
Nutritional values are estimates and may vary based on specific ingredients used.
How to Store and Reheat Mummy Hand Pies
Once your spooky Mummy Hand Pies have cooled completely, it’s time to think about storing any leftovers of this delightful mummy pastry recipe. Proper storage ensures they stay fresh and delicious for your next craving. After baking, let the pies cool on a wire rack for at least 30 minutes. Once cool, place them in an airtight container. You can store them at room temperature for up to two days, or in the refrigerator for up to four days. For longer storage, these mummy pies freeze beautifully! Wrap each individual pie tightly in plastic wrap, then in aluminum foil, and freeze for up to three months. To reheat, thaw frozen pies overnight in the refrigerator, or warm them gently in a 300°F (150°C) oven for about 5-10 minutes until heated through. For more on food storage, consult USDA food storage guidelines.
Frequently Asked Questions About Mummy Hand Pies
What are mummy hand pies?
Mummy hand pies are a fun and festive Halloween treat made by shaping dough, like crescent roll dough, into a mummy shape. They are typically filled with a sweet mixture, such as chocolate hazelnut spread or fruit preserves, and decorated with thin strips of dough to resemble mummy bandages, often with mini chocolate chips for eyes. They are a creative way to enjoy a hand pie during the spooky season.
Can I use a different filling for my mummy hand pies?
Absolutely! While chocolate hazelnut spread is popular, feel free to get creative with your mummy pie filling. Other fantastic options include: apple pie filling, cherry preserves, lemon curd, cream cheese frosting, or even a simple mixture of brown sugar and cinnamon. The possibilities are endless for these spooky desserts! For more creative ideas, you might find inspiration from our featured author’s recipes.
Is there a specific mummy hand pie tutorial I should follow?
This recipe provides a comprehensive mummy hand pie tutorial to guide you through every step, from preparing the dough to decorating the final spooky pies. We focus on using readily available ingredients and simple techniques to ensure your homemade mummy pies turn out perfectly. Just follow the instructions carefully, and you’ll have delightful mummy hand pies in no time!
How do I make the mummy bandages look realistic?
To achieve a realistic mummy bandage look, use a sharp knife or pizza cutter to slice thin, consistent strips of dough, about 1/4 to 1/2 inch wide. Lay these strips crisscross over the pie, overlapping them slightly to create texture. Don’t worry about perfection; a slightly messy, layered look adds to the charm and spookiness of your mummy hand pies.
Variations of Mummy Hand Pies You Can Try
While the classic chocolate hazelnut version is fantastic, don’t be afraid to get creative with your Mummy Hand Pies! These Halloween mummy hand pie ideas offer exciting twists on the original recipe, ensuring there’s a spooky treat for everyone. Experimenting with different flavors and methods can lead to some truly creative mummy pie designs.
- Gluten-Free Mummies: Simply swap out the standard crescent roll dough for a gluten-free alternative. The process remains the same, offering a delicious option for those with gluten sensitivities.
- Savory Mummy Pies: For a less sweet option, try a savory filling! A mixture of cheese and spinach, or even a small amount of seasoned ground meat, can be used inside the mummy pastry for a delightful savory hand pie.
- Baked vs. Air Fryer: While baking is traditional, you can also make these in an air fryer for a quicker cook time. Air fry at around 350°F (175°C) for 10-12 minutes, watching closely.
- Seasonal Flavor Infusions: Beyond chocolate, consider fillings like spiced apple, pumpkin pie, or even a tangy berry jam. These variations add a unique seasonal flair to your mummy-shaped hand pies.
Mummy Hand Pies: 10 Easy Spooky Treats

Mummy Hand Pies are a fun and spooky Halloween dessert made with crescent roll dough, a sweet filling, and a cute mummy bandage design. They are easy to prepare, customizable with your favorite fillings, and perfect for family activities or parties.
- Prep Time: 20 minutes
- Cook Time: 15-20 minutes
- Total Time: 40 minutes
- Yield: Varies based on dough package size
- Category: Dessert
- Method: Baking
- Cuisine: American
- Diet: Vegetarian
Ingredients
- 1 package refrigerated crescent roll dough
- 1 cup chocolate hazelnut spread (or filling of choice)
- 1 egg (for egg wash)
- 1/4 cup powdered sugar (for icing)
- 1 tablespoon milk (for icing)
- 1 teaspoon vanilla extract (for icing)
- Mini chocolate chips (for mummy eyes)
Instructions
- Preheat your oven to 375°F (190°C). Line a baking sheet with parchment paper.
- Unroll the crescent roll dough on a clean surface. Press the seams together to create one large sheet.
- Cut the dough into rectangles, about 4×3 inches in size.
- Place approximately one tablespoon of chocolate hazelnut spread in the center of each rectangle, leaving space at the edges.
- Fold the dough over to create a pocket, sealing the edges by pinching them together.
- Use a small knife to slice thin strips from the remaining dough to create “bandages.”
- Lay the dough strips crisscross over the top of each pie and press down gently to secure them.
- In a small bowl, beat the egg. Use a pastry brush to apply the egg wash on the dough for a golden finish.
- Transfer the mummy hand pies to the prepared baking sheet and bake for 15-20 minutes until golden brown.
- Remove from the oven and let them cool for a few minutes.
- In a small bowl, whisk together powdered sugar, milk, and vanilla extract until smooth. Adjust the consistency as necessary.
- Use the icing to drizzle “bandages” across the pies and place mini chocolate chips as eyes.
Notes
- For best results, use a quality refrigerated crescent roll dough.
- Experiment with various fillings such as fruit preserves, cream cheese, or pumpkin pie filling.
- Add Halloween-themed sprinkles on top of the icing for extra flair.
- Involve children in the decorating process for a fun family activity.
- Savory variations can be made by using cheese and spinach as a filling.
- For a gluten-free option, use gluten-free crescent roll dough.
- Incorporate seasonal flavors like pumpkin spice or apple pie filling.
- Create mini mummy hand pies for bite-sized treats.
- Store uneaten pies in an airtight container at room temperature for up to two days or refrigerate for up to one week.
- Mummy Hand Pies can be frozen for up to three months. Wrap individually and thaw at room temperature before serving or reheat.
Nutrition
- Serving Size: 1 pie
- Calories: Varies based on filling and dough
- Sugar: Varies based on filling and icing
- Sodium: Varies based on dough
- Fat: Varies based on dough and filling
- Saturated Fat: Varies based on dough and filling
- Unsaturated Fat: Varies based on dough and filling
- Trans Fat: Varies based on dough and filling
- Carbohydrates: Varies based on dough and filling
- Fiber: Varies based on filling
- Protein: Varies based on dough and filling
- Cholesterol: Varies based on dough and filling


Leave a Reply