Graveyard Brownies have become my absolute favorite treat to whip up for Halloween. There’s something so satisfyingly spooky about transforming a rich, fudgy brownie into a miniature haunted landscape. I remember my first attempt at making these Halloween Graveyard Brownies; I was a kid, and my mom helped me place candy corn tombstones and gummy worms that looked like they were crawling out of the ground. The smell of chocolate filled the kitchen, and the anticipation of digging into those eerie creations was almost too much! They’re surprisingly easy, making them the perfect project for a fun afternoon. Let’s get cooking!
Why You’ll Love Graveyard Brownies
These aren’t just any brownies; they’re an experience! You’ll adore these Graveyard Brownies for so many reasons:
- Incredible Taste: Rich, fudgy chocolate flavor that’s decadently delicious.
- Quick Prep Time: You can have these ready to bake in under 20 minutes.
- Budget-Friendly Fun: Uses common pantry staples, making them affordable.
- Family-Friendly Activity: They’re a blast to make with kids, creating truly easy graveyard brownies.
- Perfect for Parties: They’re a guaranteed hit at any Halloween gathering.
- Customizable Decor: Let your creativity run wild with endless topping possibilities.
- Impressive Presentation: They look spooktacular with minimal effort, truly easy graveyard brownies.
- Satisfyingly Spooky: The visual appeal is just as fun as the taste!
Graveyard Brownies Ingredients
Gathering these key Graveyard Brownies ingredients is the first step to creating your spooky dessert. The foundation is a rich, fudgy brownie base, and the decorations bring the graveyard scene to life. Here’s what you’ll need:
- 1 cup unsalted butter – melting this makes the brownie base wonderfully rich.
- 2 cups granulated sugar – ensures sweetness and a tender crumb.
- 4 large eggs – room temperature eggs incorporate better for a smoother batter.
- 1 teaspoon vanilla extract – enhances the deep chocolate flavor.
- 1 cup all-purpose flour – provides structure to our brownies.
- 1 cup unsweetened cocoa powder – for that intense, chocolatey goodness.
- 1/2 teaspoon salt – balances the sweetness and deepens flavor.
- 1/2 teaspoon baking powder – a little lift for our fudgy base.
- 1 cup chocolate chips (optional) – for extra gooey chocolate pockets!
- Cookie crumbs (for dirt) – Oreos or chocolate wafers work great for that perfect graveyard soil look.
- Gummy worms or similar candy (for decoration) – these add a fun, creepy crawly element.
- Fondant or chocolate tombstones (for decor) – the essential graveyard markers!
How to Make Graveyard Brownies
Creating these spooky delights is surprisingly straightforward. Follow these steps, and you’ll be assembling your own haunted landscape in no time. My favorite part of how to make Graveyard Brownies is the rich smell that fills the kitchen!
- Step 1: Preheat your oven to 350°F (175°C). It’s crucial to get the temperature just right for perfectly fudgy brownies. Grease a 9×13-inch baking pan thoroughly.
- Step 2: Melt the butter in a medium saucepan over low heat. You want it fully melted but not browned. Remove it from the heat immediately.
- Step 3: Stir the granulated sugar into the melted butter until it’s well combined. Then, add the eggs one at a time, whisking well after each addition to create a smooth, emulsified base. Stir in the vanilla extract for that classic aroma.
- Step 4: In a separate bowl, whisk together the all-purpose flour, unsweetened cocoa powder, salt, and baking powder. This dry mixture ensures everything is evenly distributed. Gradually add this dry mixture to the wet ingredients, mixing until *just* combined. Be careful not to overmix; that’s key to tender brownies!
- Step 5: If you’re adding chocolate chips for extra gooeyness, gently fold them into the batter now.
- Step 6: Pour the batter into your prepared baking pan and smooth the top evenly. Bake for 30-35 minutes. You’ll know they’re ready when a toothpick inserted into the center comes out with moist crumbs clinging to it – this is the sign of perfectly fudgy brownies.
- Step 7: Let the brownies cool in the pan for about 10-15 minutes. This allows them to set up slightly. Then, carefully transfer them to a wire rack to cool completely. Patience here is important for clean decorating.
- Step 8: Once completely cool, cut the brownies into your desired shapes. Squares or rectangles work best for creating individual graveyard plots. This is where the magic really starts to happen when you’re learning how to make Graveyard Brownies!
- Step 9: Now for the fun part – decorating! Sprinkle cookie crumbs generously over the brownies to resemble dark soil. Arrange your candy tombstones and gummy worms to create a spooky graveyard scene.

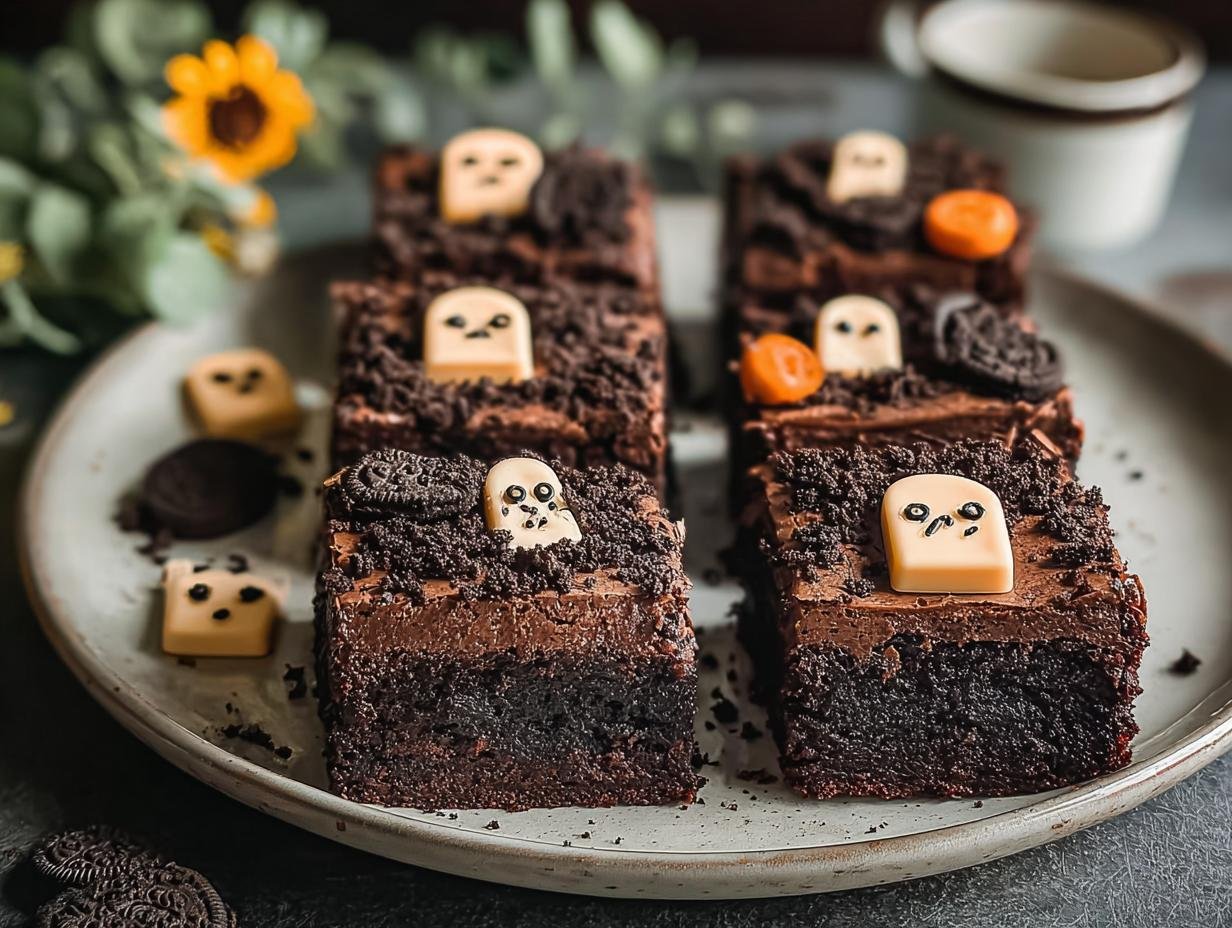
Graveyard Brownies Decorating Ideas
Once your rich, fudgy brownies are completely cool, it’s time for the creative part – turning them into a spooky graveyard! These decorating ideas will help you achieve a truly haunted effect.
- Create Realistic Dirt: For the best ‘graveyard dirt’, I love using crushed chocolate sandwich cookies (like Oreos) with the cream filling removed. Pulse them in a food processor until they resemble coarse sand.
- DIY Tombstones: You can easily make your own tombstones from fondant or hardened chocolate. Use a small knife to etch epitaphs like “R.I.P.” or “Here Lies…” onto them before they set.
- Eerie Edges: For an extra creepy touch, try lightly dusting the edges of the brownie “plots” with a bit of black or gray edible food coloring dust.
- Wiggly “Worms”: Gummy worms are classic, but for something different, try cutting red licorice laces into shorter pieces to mimic worms emerging from the soil.
- Foggy Atmosphere: A light dusting of powdered sugar can create a ghostly, foggy effect over your entire graveyard scene.
What are the best cookie crumbs for ‘graveyard dirt’?
For the most authentic-looking and delicious ‘dirt’, I highly recommend using chocolate sandwich cookies like Oreos, with the cream filling scraped out. Pulse them in a food processor until they reach a coarse, sandy texture. This gives you fantastic edible graveyard brownies with a rich chocolate flavor. For more baking tips, you can check out our author’s other recipes.
Can I use store-bought tombstones for Graveyard Brownies?
Absolutely! Many grocery stores and craft stores sell pre-made edible tombstones made from chocolate or fondant, which saves a lot of time. You can place these directly onto your brownie “plots” before serving.
How do I achieve the perfect ‘spooky’ look for Graveyard Brownies?
The key is layering! Don’t just stick one tombstone on. Create depth by varying tombstone heights and placing gummy worms or candy spiders around them. Avoid over-decorating; sometimes less is more for that eerie, desolate graveyard feel. You can learn more about food presentation on Wikipedia’s food styling page.
Best Ways to Serve Graveyard Brownies
These spooky treats are fantastic on their own, but serving them up with a few complementary touches really elevates them into a memorable graveyard brownie dessert. They’re perfect for any Halloween party or a fun family night!
- Classic Pairing: Serve your decorated brownies alongside a scoop of creamy vanilla ice cream. The cool, smooth ice cream is the perfect contrast to the rich, fudgy brownie.
- Milk’s Favorite Companion: A tall, cold glass of milk is a classic for a reason! It cuts through the sweetness and richness of the chocolate, making each bite even more enjoyable.
- Halloween Dessert Platter: Arrange your Graveyard Brownies alongside other Halloween-themed treats like ghost cookies or pumpkin-shaped cupcakes for a festive and abundant dessert table. For more Halloween ideas, visit Allrecipes’ Halloween section.
Nutrition Facts for Graveyard Brownies
Here’s a breakdown of the nutritional information for these fun Halloween treats. Remember that adding extra candies or fillings can change these numbers!
- Calories: Approximately 275
- Fat: Approximately 16g
- Saturated Fat: Approximately 9g
- Protein: Approximately 4g
- Carbohydrates: Approximately 35g
- Fiber: Approximately 3g
- Sugar: Approximately 32g
- Sodium: Approximately 110mg
Nutritional values are estimates and may vary based on specific ingredients used, especially with added decorations.
How to Store and Reheat Graveyard Brownies
Proper storage is key to keeping your delicious Graveyard Brownies fresh and spooky. After all that hard work decorating, you want them to stay perfect! I always make sure mine are completely cool before attempting any storage.
- Cool Completely: Ensure your brownies have cooled to room temperature before storing. Storing warm brownies can lead to condensation, making them soggy.
- Airtight Container: Place cooled brownies in an airtight container. If you have many, you can layer them with parchment paper or wax paper to prevent sticking, especially if the decorations are delicate.
- Room Temperature Storage: For immediate enjoyment, store them at room temperature for up to 3-4 days. They tend to maintain their fudgy texture best this way.
- Refrigerator Storage: If your kitchen is warm or you want them to last a bit longer, refrigerating them for up to a week is an option, though they can firm up.
- Freezer-Friendly: These brownies freeze beautifully! Wrap individual brownies tightly in plastic wrap, then in aluminum foil. You can store them in the freezer for up to 3 months. This is a great make-ahead strategy for parties.
- Reheating: To reheat frozen brownies, thaw them overnight in the refrigerator. For a slightly warmed treat, you can microwave a single brownie for about 10-15 seconds.
Frequently Asked Questions About Graveyard Brownies
What are Graveyard Brownies?
Graveyard Brownies are a fun, festive Halloween dessert where rich, fudgy brownies are decorated to look like a miniature graveyard. Typically, they are topped with crushed cookies for ‘dirt’ and adorned with candy tombstones, gummy worms, or candy ghosts to create a spooky scene. They’re a creative way to enjoy a classic chocolate treat! For more about Halloween traditions, you can visit History.com.
Can I make the brownie base ahead of time?
Yes, absolutely! You can bake the brownie base one or two days in advance. Once completely cooled, store them in an airtight container at room temperature. This makes decorating the day of your event much quicker and less stressful, ensuring you have perfectly prepared Halloween Graveyard Brownies ready to go. You can find more baking tips on our privacy policy page.
What kind of frosting works best for decorating?
For decorating your Graveyard Brownies, a simple buttercream frosting or even a chocolate ganache works wonderfully as an adhesive for your tombstones and other candy decorations. You can also use melted chocolate. Make sure the brownies are completely cool before applying any frosting.
Are there gluten-free or vegan options for Graveyard Brownies?
You can definitely adapt this recipe! For gluten-free Graveyard Brownies, simply use a good quality gluten-free all-purpose flour blend in place of the regular flour. For a vegan version, swap the butter for coconut oil or vegan butter sticks and use flax eggs (1 tablespoon flaxseed meal mixed with 3 tablespoons water, let sit for 5 minutes) instead of real eggs.
Variations of Graveyard Brownies You Can Try
While the classic fudgy brownie base is fantastic, there are so many ways to customize your Graveyard Brownies to suit different tastes and dietary needs! Don’t be afraid to get creative with these ideas.
- Rich Chocolate Variation: For an intensely decadent treat, try making these chocolate graveyard brownies by adding an extra half cup of chocolate chips to the batter, or even a teaspoon of espresso powder to deepen the chocolate flavor.
- Gluten-Free Graveyard Brownies: Easily make these gluten-free by swapping the all-purpose flour for a 1:1 gluten-free baking blend. Ensure your cocoa powder and any added chocolate chips are also certified gluten-free.
- Vegan Graveyard Brownies: For a vegan version, substitute the butter with melted coconut oil or a vegan butter stick, and replace the eggs with flax eggs (1 tablespoon flaxseed meal mixed with 3 tablespoons water, let sit for 5 minutes).
- Peanut Butter Swirl: Swirl a few tablespoons of peanut butter into the brownie batter before baking for a delicious peanut butter-chocolate combination that’s out of this world!

Spooky Graveyard Brownies: 1 Simple Recipe

Create spooky and delicious Graveyard Brownies for a festive Halloween celebration. This recipe guides you through making rich, fudgy brownies and decorating them with candy and edible tombstones to resemble a graveyard scene.
- Prep Time: 20 minutes
- Cook Time: 30-35 minutes
- Total Time: 1 hour 10 minutes
- Yield: 12–16 servings 1x
- Category: Dessert
- Method: Baking
- Cuisine: American
- Diet: Vegetarian
Ingredients
- 1 cup unsalted butter
- 2 cups granulated sugar
- 4 large eggs
- 1 teaspoon vanilla extract
- 1 cup all-purpose flour
- 1 cup unsweetened cocoa powder
- 1/2 teaspoon salt
- 1/2 teaspoon baking powder
- 1 cup chocolate chips (optional)
- Cookie crumbs (for dirt)
- Gummy worms or similar candy (for decoration)
- Fondant or chocolate tombstones (for decor)
Instructions
- Preheat your oven to 350°F (175°C). Grease a 9×13-inch baking pan.
- Melt the butter in a saucepan over low heat. Remove from heat once melted.
- Stir in the granulated sugar until combined. Add eggs one at a time, mixing well after each addition. Add vanilla extract.
- In a separate bowl, sift together flour, cocoa powder, salt, and baking powder. Gradually mix into the wet ingredients until just combined.
- Fold in chocolate chips, if using.
- Pour batter into the prepared pan and smooth evenly. Bake for 30-35 minutes, or until a toothpick inserted into the center comes out with moist crumbs.
- Cool brownies in the pan for 10-15 minutes, then transfer to a wire rack to cool completely.
- Cut cooled brownies into squares or rectangles.
- Decorate by sprinkling cookie crumbs for dirt. Place candy tombstones and gummy worms on top to create a graveyard effect.
Notes
- Use fresh ingredients for best flavor.
- Customize toppings with various Halloween candies.
- Add espresso powder to the batter for a deeper chocolate taste.
- Ensure brownies are completely cool before decorating.
- Serve with vanilla ice cream.
- For a gluten-free version, use a gluten-free baking blend.
- For a vegan version, use flaxseed meal for eggs and coconut oil for butter.
- Store in an airtight container at room temperature for 3-4 days, or refrigerate for longer freshness.
- Freeze by wrapping tightly in plastic wrap and then foil for up to 3 months. Thaw in the fridge overnight.
Nutrition
- Serving Size: 1 brownie
- Calories: Approximately 250-300 (will vary based on additions)
- Sugar: Approximately 30-40g
- Sodium: Approximately 100mg
- Fat: Approximately 15-20g
- Saturated Fat: Approximately 8-10g
- Unsaturated Fat: Approximately 7-10g
- Trans Fat: 0g
- Carbohydrates: Approximately 30-40g
- Fiber: Approximately 2-3g
- Protein: Approximately 3-4g
- Cholesterol: Approximately 60mg


Leave a Reply