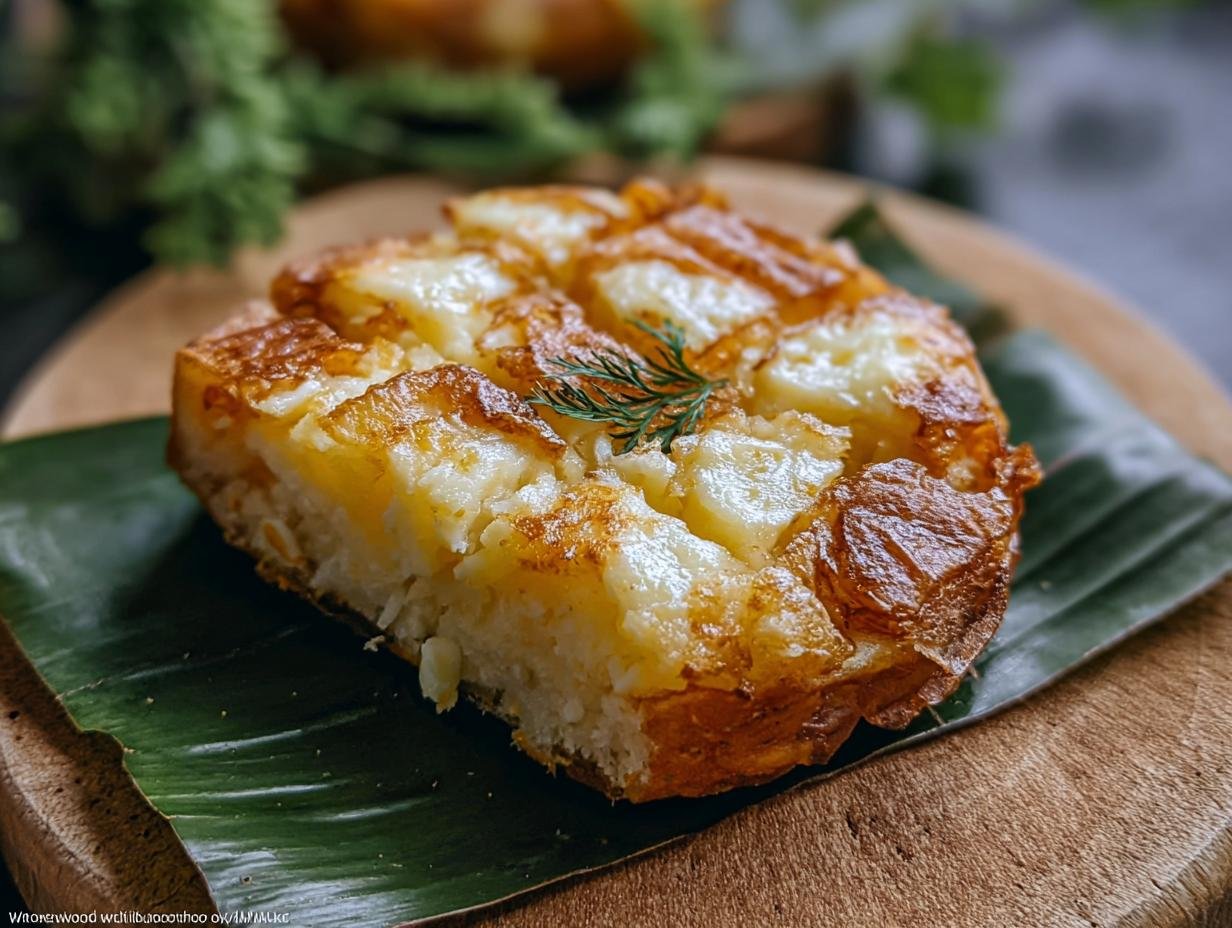
Bibingka has a special place in my heart, conjuring up memories of Christmas mornings filled with the warm, comforting aroma of this classic Filipino rice cake. I remember as a child, the anticipation of that first bite – the slightly sweet, slightly savory, wonderfully chewy texture made it an instant favorite. It’s truly a delightful treat that brings people together. This easy Bibingka recipe is my go-to for recreating those cherished moments at home, and I can’t wait for you to experience it too. Let’s get cooking!
Why You’ll Love This Bibingka
This recipe is a winner for so many reasons. You’ll adore the unique taste that’s perfectly balanced between sweet and savory, with that delightful chewy texture you expect from a traditional Filipino rice cake. It’s surprisingly quick to prepare, making it ideal for busy weeknights or last-minute holiday baking. Plus, it’s a fantastic budget-friendly option that tastes way more expensive than it is!
- Incredible flavor: A perfect blend of sweetness from sugar and richness from coconut milk and butter.
- Quick preparation: Get this delicious treat ready in under an hour total!
- Health-conscious: Enjoy a wonderful gluten-free Bibingka that everyone can savor.
- Family-friendly: Kids and adults alike will love this comforting dessert.
- Budget-friendly: Made with common pantry staples, it’s an affordable indulgence.
- A taste of tradition: Experience an authentic gluten-free Bibingka that brings Filipino culture to your table.
Authentic Bibingka Ingredients
Crafting this delicious Filipino rice cake is all about quality ingredients. You’ll need 2 cups rice flour for that classic texture, along with 0.5 teaspoon salt and 2 teaspoons baking powder to help it rise. For richness, we’ll use 0.5 cup butter, softened to room temperature, and 0.75 cup granulated sugar for sweetness. The heart of the Bibingka batter ingredients comes from 1 cup coconut milk and 0.5 cup fresh milk, which give it its signature moist and creamy consistency.
We’ll also incorporate 2 large raw eggs, and for that authentic sweet and salty kick, you’ll need 2 large salted duck eggs, sliced. To finish, have 0.5 cup grated cheese (like cheddar) and 0.5 cup grated coconut ready for topping. Finally, don’t forget 2 pieces pre-cut banana leaf to line your pans, which imparts a subtle, wonderful flavor.

How to Make Bibingka
Let’s get this traditional Bibingka preparation started! The aroma that fills your kitchen as this Filipino rice cake bakes is pure magic.
- Step 1: Preheat your oven to 375°F (190°C). Make sure your oven is fully heated before you start assembling the batter. This ensures even cooking and that perfect rise.
- Step 2: In a large bowl, whisk together 2 cups rice flour, 0.5 teaspoon salt, and 2 teaspoons baking powder. This dry mixture forms the base of our Bibingka batter.
- Step 3: In a separate bowl, cream the 0.5 cup butter with the 0.75 cup granulated sugar until it’s light and fluffy. This creaming process incorporates air, contributing to a lighter texture.
- Step 4: Whisk in the 2 large raw eggs, one at a time, into the butter-sugar mixture until everything is well combined and smooth.
- Step 5: Gradually combine the dry ingredients from Step 2 into the wet ingredients from Step 4. Then, slowly whisk in 1 cup coconut milk and 0.5 cup fresh milk until you have a smooth, pourable batter. The scent of coconut milk is already so inviting!
- Step 6: Line your baking pan with the 2 pieces pre-cut banana leaf, or use parchment paper if you don’t have banana leaves. Pour the Bibingka batter evenly into the prepared pan. This step is crucial for that authentic flavor and easy removal.
- Step 7: Bake for 15 minutes. Keep an eye on it; you want the edges to start setting.
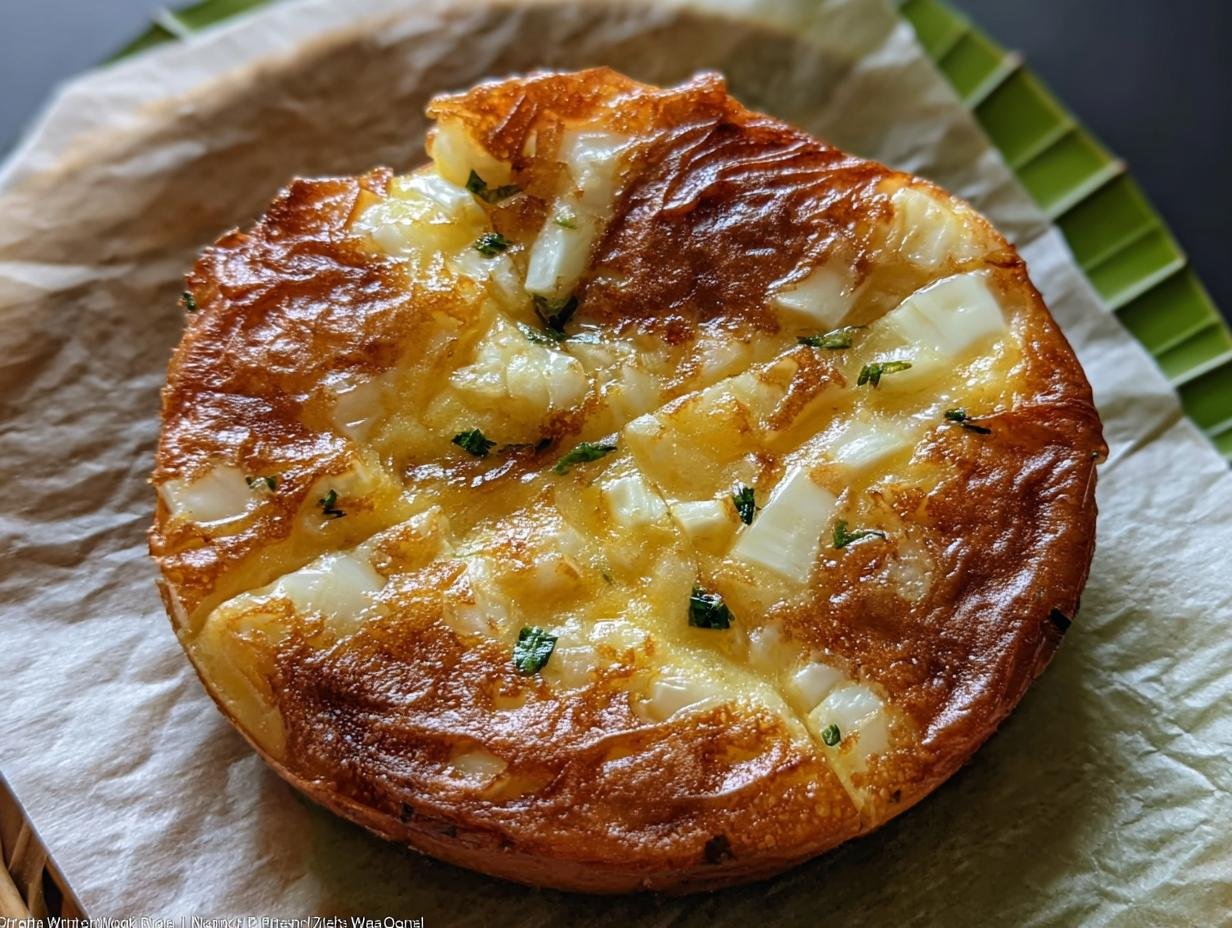
- Step 8: Carefully remove the pan from the oven. Arrange slices of 2 large salted duck eggs on top of the partially baked Bibingka, then sprinkle generously with 0.5 cup grated cheese. Return the pan to the oven.
- Step 9: Bake for an additional 15-20 minutes, or until the top of your Bibingka is a beautiful medium brown and a toothpick inserted into the center comes out clean. The golden-brown color is a sign of perfect traditional Bibingka preparation.
- Step 10: Once baked, let the Bibingka cool slightly in the pan for about 5-10 minutes. While it’s still warm, brush the top with melted butter and sprinkle generously with 0.5 cup grated coconut for that classic finish. This part of the traditional Bibingka preparation adds so much flavor and texture!
Pro Tips for the Best Bibingka
Achieving that perfect, cloud-like texture for your Filipino rice cake is easier than you think with these insider tips. They’ll elevate your traditional Bibingka from good to absolutely unforgettable.
- Always use room temperature ingredients for the butter, eggs, and milk. This helps everything emulsify beautifully, creating a smoother Bibingka batter.
- Don’t overmix the batter once the wet and dry ingredients are combined; a few lumps are okay! Overmixing can develop the rice flour too much, resulting in a tough cake.
- For an authentic touch, use real banana leaves. If you can’t find them, parchment paper is a good substitute, but the banana leaf really adds a subtle, earthy aroma that makes this a true traditional Bibingka.
- Ensure your oven is fully preheated before baking. This is crucial for the initial rise and helps achieve that characteristic golden-brown top.
What’s the secret to perfect Bibingka?
The secret lies in the right balance of ingredients and proper baking technique. Using coconut milk and fresh milk together creates a wonderfully moist crumb. The Bibingka recipe meaning is truly about celebrating simple, wholesome ingredients coming together to create something magical. Learn more about our culinary philosophy.
Can I make Bibingka ahead of time?
You can prepare the Bibingka batter up to 24 hours in advance and store it covered in the refrigerator. However, for the best texture and flavor, it’s ideal to bake it fresh. The toppings like salted egg and cheese are best added just before baking.
How do I avoid common mistakes with Bibingka?
A common pitfall is an oven that isn’t hot enough, leading to a dense cake. Also, be careful not to overbake, which can dry out your Filipino rice cake. Ensure your baking powder is fresh for the best lift. For more baking tips, check out our expert tips.
Best Ways to Serve Bibingka
Once your beautiful Filipino rice cake is baked and brushed with butter and coconut, the real fun begins: how to serve Bibingka! The classic way is to enjoy it warm, straight from the oven, perhaps with a light dusting of powdered sugar for a little extra sweetness. For a truly traditional experience, serve it alongside a hot cup of coffee or tea, which beautifully complements its sweet and savory notes. You can find more about pairing suggestions here.
I also love pairing a slice of this easy Bibingka recipe with some fresh fruit, like ripe mangoes, for a delightful contrast. Don’t be afraid to experiment with toppings – a drizzle of condensed milk or even a dollop of ube jam can transform your Bibingka into something truly special. It’s a versatile treat that’s perfect for breakfast, dessert, or even a snack any time of day. Explore our recipe variations.
Bibingka Nutrition Facts
Here’s a look at the nutritional breakdown for one slice of this delicious Filipino rice cake. It’s a wonderfully rich and satisfying treat!
- Calories: 250 kcal
- Fat: 10 g
- Saturated Fat: 5 g
- Protein: 6 g
- Carbohydrates: 35 g
- Fiber: 1 g
- Sugar: 15 g
- Sodium: 150 mg
Nutritional values are estimates and may vary based on specific ingredients used. For more information on nutritional data, please see our privacy policy.
How to Store and Reheat Bibingka
Proper storage is key to keeping your delicious Filipino rice cake tasting its best. Once your Bibingka has cooled completely, wrap individual slices tightly in plastic wrap. Then, place the wrapped slices in an airtight container or a freezer-safe bag. This will help maintain its moisture and prevent freezer burn. Stored this way, your Bibingka will stay fresh in the refrigerator for about 3 to 4 days.
For longer storage, you can freeze your Bibingka for up to 3 months. When you’re ready to enjoy it again, the best way to reheat is in a toaster oven or a conventional oven. Place a slice on a baking sheet and warm it at 300°F (150°C) for about 5-10 minutes, or until heated through. This method helps restore its slightly crisp exterior and soft interior. You can also reheat it gently in a microwave, though the texture might be a bit softer. Consider our tips for best results.
Frequently Asked Questions About Bibingka
What are the key ingredients that make Bibingka unique?
The magic of Bibingka comes from a few core components. Rice flour is essential for its chewy texture, while coconut milk and fresh milk create a rich, moist crumb. The traditional toppings of salted duck egg and grated cheese add a delightful sweet and savory contrast that’s truly characteristic of this Filipino rice cake.
What are Bibingka origins and history?
The history of Bibingka is deeply rooted in Filipino culture, particularly as a celebratory food during the Christmas season. Its origins can be traced back to pre-colonial times, evolving over centuries with influences from various cultures. It’s often associated with Simbang Gabi, the dawn masses leading up to Christmas, making it a cherished tradition. Learn more about Bibingka’s cultural significance.
Can I make Bibingka without a traditional clay pot or banana leaves?
Absolutely! While traditional methods use clay pots lined with banana leaves for a unique earthy flavor, you can easily make delicious Bibingka in a standard oven. Using parchment paper or greased metal baking pans works perfectly well. The key is still to achieve that golden-brown top and tender interior.
What’s the difference between Bibingka and Puto?
While both are popular Filipino rice cakes, Bibingka and Puto have distinct differences. Bibingka is typically larger, moister, and often cooked with toppings like salted egg and cheese, giving it a sweet and savory profile. Puto, on the other hand, is usually smaller, steamed, and has a lighter, fluffier texture, often enjoyed with cheese or simply plain.
Variations of Bibingka You Can Try
While this classic recipe is wonderful, exploring different types of Bibingka can be a fun adventure! These variations offer exciting new flavors and cater to various dietary needs, proving just how versatile this beloved Filipino rice cake can be.

- Gluten-Free Bibingka Supreme: For those sticking strictly to gluten-free, ensure your rice flour is certified GF. You can also experiment with adding a touch of tapioca starch for an even chewier texture.
- Bibingka Muffin Style: Want a quicker cooking method? Pour your Bibingka batter into a greased muffin tin. This makes for perfectly portioned, individual treats that bake faster – ideal for a speedy breakfast!
- Ube Bibingka: Infuse your batter with a vibrant purple hue and a subtle flavor by adding a few tablespoons of ube halaya (purple yam jam). The beautiful color and unique taste make this a festive twist.
- Vegan Bibingka: Easily adapt this recipe for a vegan audience. Substitute the eggs with a flax egg (1 tbsp flaxseed meal + 3 tbsp water per egg) and use plant-based milk and butter alternatives. The result is a delicious dairy-free and egg-free Filipino rice cake.
Bibingka: Easy 1-Hour Filipino Rice Cake

This recipe for Bibingka offers a delightful and easy way to create a traditional Filipino rice cake, perfect for holiday celebrations. It’s a gluten-free treat with a warm, inviting aroma and a sweet and savory flavor profile, customizable with various toppings.
- Prep Time: 20 minutes
- Cook Time: 35 minutes
- Total Time: 1 hour
- Yield: 8 slices 1x
- Category: Desserts
- Method: Baking
- Cuisine: Filipino
- Diet: Gluten Free
Ingredients
- 2 cups Rice Flour
- 0.5 teaspoon Salt
- 2 teaspoons Baking Powder
- 0.5 cup Butter
- 0.75 cup Granulated Sugar
- 1 cup Coconut Milk
- 0.5 cup Fresh Milk
- 2 large Raw Eggs
- 2 large Salted Duck Egg
- 0.5 cup Grated Cheese
- 0.5 cup Grated Coconut
- 2 pieces Pre-cut Banana Leaf
Instructions
- Preheat your oven to 375°F (190°C).
- In a bowl, mix together rice flour, baking powder, and salt.
- In a separate bowl, cream the butter and gradually add granulated sugar until fluffy.
- Whisk in the raw eggs until well incorporated.
- Combine the dry mixture with the wet mixture, then whisk in coconut milk and fresh milk until smooth.
- Line a baking pan with pre-cut banana leaf or parchment paper, and pour in the batter.
- Bake for 15 minutes.
- Top with sliced salted duck egg and grated cheese, then return to the oven.
- Bake for an additional 15-20 minutes, or until the top is medium brown.
- Cool slightly, then brush with butter and sprinkle with grated coconut.
Notes
- Optional: Enjoy with a dusting of powdered sugar for added sweetness.
- For a dairy-free option, substitute butter with vegetable oil.
- For a vegan substitute for eggs, use flaxseed meal mixed with water.
- Regular salted eggs can be used as a substitute for salted duck eggs.
- Shredded desiccated coconut is a tasty option for grated coconut.
- Parchment paper can be used as a substitute for banana leaf.
Nutrition
- Serving Size: 1 slice
- Calories: 250 kcal
- Sugar: 15 g
- Sodium: 150 mg
- Fat: 10 g
- Saturated Fat: 5 g
- Unsaturated Fat: 5 g
- Trans Fat: 0 g
- Carbohydrates: 35 g
- Fiber: 1 g
- Protein: 6 g
- Cholesterol: 90 mg


Leave a Reply