Chutney has always held a special place in my heart, a vibrant memory from my childhood kitchen. I remember my grandmother painstakingly grinding fresh spices and herbs, transforming simple ingredients into a burst of flavor that elevated every meal. That incredible aroma of spices, the tangy sweetness, and the occasional kick of heat – it was pure magic. This collection of Indian chutney recipes is my tribute to her, a way to bring those cherished tastes to your table. You’ll discover how easy it is to make homemade chutney, a versatile condiment that adds an unforgettable zing to any dish. Let’s get cooking!
Why You’ll Love This Chutney
I know you’ll absolutely adore making this chutney, and here’s why:
- This chutney delivers an explosion of authentic Indian flavors, perfectly balancing sweet, sour, and spicy notes.
- My easy Indian chutney recipes are incredibly quick to prepare, making them ideal for busy weeknights.
- It’s a fantastic way to add fresh, wholesome ingredients to your meals, making it a healthy choice for your family.
- Making your own chutney is super budget-friendly, often costing less than store-bought versions while tasting much better.
- These homemade Indian chutney recipes are versatile and can be adapted to suit everyone’s taste, even picky eaters.
- You’ll love how this vibrant condiment elevates simple dishes, turning an ordinary meal into something special.
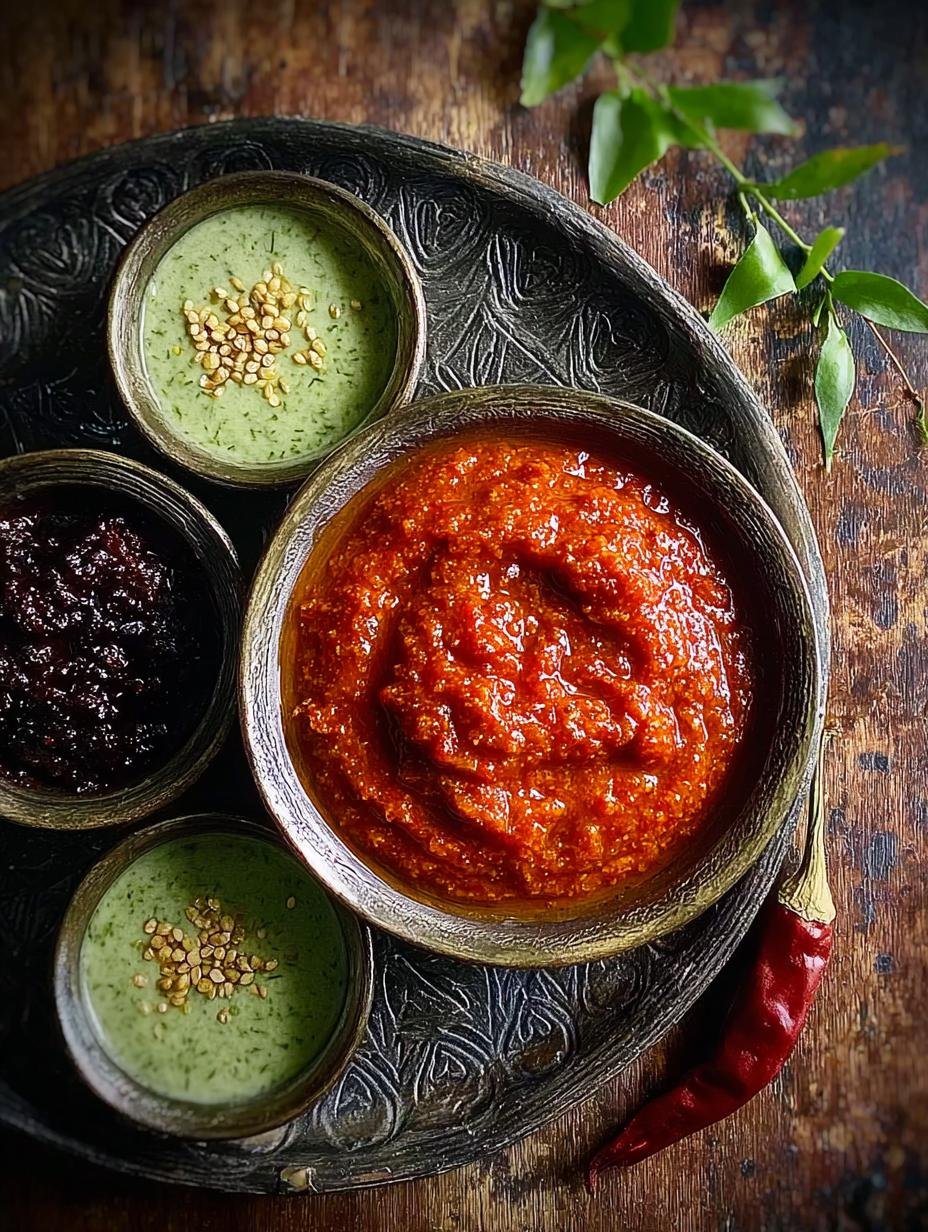
Ingredients for Homemade Chutney
Ever wondered what is chutney made of? Here’s a breakdown of the fresh, flavorful ingredients you’ll need to create your own delicious homemade chutney. I’ve found that using quality ingredients truly makes all the difference in the final taste.
- 2/3 cup Coconut, grated – fresh or frozen, for a creamy base.
- 2 Green chilies – adjust to your spice preference for that perfect kick.
- 4 sprigs Cilantro or Coriander leaves – essential for a fresh, vibrant flavor in your chutney.
- 1/2 cup Water – to help blend everything into a smooth paste.
- 1/4 tsp Salt – enhances all the other flavors.
- 20 sprigs Coriander leaves or Cilantro – for the coriander variation, providing a robust herbaceous note.
- 1/2 tsp Tamarind (or small ball) – gives a wonderful tangy sourness to the chutney.
- 1 tbsp Coriander seeds – adds an earthy, aromatic depth when roasted.
- 4 Dry red chillies – for a smoky heat, again, feel free to adjust.
- 6 Mint leaves – a refreshing addition, especially in green chutney.
- 2 Garlic cloves – peeled, for a pungent aroma and taste.
- 1 inch Ginger slice – peeled, adds a warm, spicy undertone.
- 1 tbsp Oil (preferably coconut oil) – used for tempering and sautéing, adding richness.
- 1/2 tsp Cumin seeds – a staple Indian spice for tempering.
- 5 Dry red chilies – for the tempering, adding color and a subtle heat.
- 6 Garlic cloves, chopped roughly – for the tomato-peanut variation, providing a strong aromatic base.
- 1 tbsp Dalia or Hurigadale or Putani (cracked wheat or similar) – gives body and a nutty flavor to the tomato-peanut chutney.
- 1/4 cup Peanuts or Groundnut – roasted, for a creamy texture and nutty taste.
- 1/4 cup Coconut, grated or chopped – for the tomato-peanut variation, adding sweetness and creaminess.
- 1 Tomato, cut into cubes – provides tanginess and moisture.
- 1/4 tsp Garam masala powder – a warm spice blend for extra aroma.
- 1 tsp Mustard seeds – crucial for the tempering, providing a characteristic pop.
- 5 Curry leaves – fresh, for an authentic South Indian aroma.
- 1 Dry red chile, broken – for the tempering, adding visual appeal and a hint of heat.
How to Make Homemade Chutney
Making your own homemade chutney might seem daunting at first, but I promise you, it’s one of the most rewarding culinary adventures. These easy chutney recipes for beginners will guide you through each step, ensuring a delicious outcome every time. I always tell my friends that the secret to great Indian cooking lies in fresh ingredients and a little bit of love.
- Step 1: First, let’s prepare the base for your chosen chutney. In a blender or mixie jar, combine the grated coconut, green chilies, and any specific herbs like coriander leaves or mint, along with tamarind, coriander seeds, dry red chilies, garlic, ginger, water, and salt. Blend these ingredients until you achieve a beautifully smooth and vibrant paste. You might need to add a little more water, spoon by spoon, to get the perfect consistency for your homemade chutney.
- Step 2: If you’re making the tomato peanut chutney, heat 1 tablespoon of oil in a small pan over medium heat. Add the cumin seeds and let them splutter, filling your kitchen with a warm, earthy aroma. Next, add the 5 dry red chilies and chopped garlic, sautéing for just a few seconds until they become fragrant. Then, stir in the dalia and peanuts, roasting them on medium heat until they turn golden and aromatic. This step is crucial for developing deep flavors in your chutney.
- Step 3: Transfer the roasted mixture from the pan to your blender. Add the grated coconut, chopped tomato, water, salt, and garam masala powder. Blend everything until it forms a smooth, rich paste. This process for making tomato peanut chutney is one of my favorite easy chutney recipes for beginners because it’s so forgiving and delicious.
- Step 4: Now comes the tempering, which is like the grand finale for any Indian chutney. In a small pan, heat 1 tablespoon of oil over medium heat. Once the oil is hot, add the mustard seeds and watch them pop and dance in the pan. Immediately follow with the broken dry red chili and fresh curry leaves. Sauté these for a few seconds until the curry leaves crisp up and release their incredible fragrance. Then, quickly turn off the heat.
- Step 5: Gently pour this aromatic tempering over your freshly blended chutney. Stir it in well to distribute the flavors evenly. The sizzle and aroma of the tempering marrying with the fresh chutney is truly a delight. Transfer your homemade chutney to a serving bowl and enjoy it fresh with your favorite Indian meals.
Pro Tips for the Best Chutney
Over the years, I’ve picked up a few tricks that truly elevate any homemade chutney. These aren’t just secrets; they’re essential steps to ensure your chutney is always bursting with flavor and has the perfect texture. I always tell my friends that a little extra care goes a long way in the kitchen!
- Always use fresh, high-quality ingredients, especially your herbs and spices. This makes a huge difference to the vibrancy of your chutney.
- Don’t over-blend your chutney. Pulse it until just smooth; over-blending can heat the ingredients and dull the fresh flavors.
- Taste as you go! Adjust salt, spice, and tanginess after initial blending to suit your preference.
- The tempering step is non-negotiable. It adds an incredible aroma and depth that truly defines an authentic Indian chutney.
- For a thicker chutney, reduce the amount of water gradually during blending until you reach your desired consistency.
What’s the secret to perfect Traditional Indian Chutneys?
The real secret lies in achieving a harmonious spice balance. It’s about knowing how to toast whole spices just enough to release their oils before grinding, and then balancing them with fresh herbs and acidic ingredients. This creates a depth of flavor that’s truly unmatched in a traditional Indian chutney.
Can I make Fruit Chutney ahead of time?
Absolutely! Fruit chutney often benefits from resting. You can prepare it up to 2-3 days in advance and store it in an airtight container in the refrigerator. This allows the flavors to meld beautifully, making your homemade chutney even more delicious when you’re ready to serve.
How do I avoid common mistakes with Spicy Chutney?
To avoid common mistakes with spicy chutney, start with a conservative amount of chilies and taste before adding more. Don’t forget to protect your hands when handling fresh chilies. Also, ensure your tempering doesn’t burn, as burnt spices can make your chutney bitter.
Best Ways to Serve Chutney Sauce for Food
Once you’ve whipped up a batch of this incredible homemade chutney, you’ll find countless ways to enjoy it. I often think of chutney as the ultimate flavor booster, transforming simple dishes into something extraordinary. Its versatility is truly one of its best qualities, making it a staple in my kitchen.
My favorite way to use this vibrant chutney is as a dipping sauce for classic Indian appetizers like crispy samosas or fluffy idlis. The tangy, spicy kick perfectly complements their savory flavors. It’s also fantastic spread inside a grilled cheese sandwich for an unexpected twist, elevating a simple lunch.
For wonderful chutney pairings, consider serving it alongside grilled meats or roasted vegetables. A dollop of this flavorful chutney on the side of a simple rice and dal dish adds an instant burst of freshness and complexity. Don’t be afraid to experiment; you’ll discover how this versatile chutney sauce for food can enhance almost any meal!

Nutrition Facts for Chutney
I always find it helpful to know what I’m eating, especially when it comes to something as flavorful as homemade chutney. Here’s a general idea of the nutritional breakdown per serving (this recipe makes 4 servings), so you can plan your meals accordingly:
- Serving Size: 2 tablespoons
- Calories: 70 kcal
- Sugar: 2 g
- Sodium: 150 mg
- Fat: 5 g
- Saturated Fat: 3.5 g
- Unsaturated Fat: 1.5 g
- Trans Fat: 0 g
- Carbohydrates: 6 g
- Fiber: 2 g
- Protein: 1.5 g
- Cholesterol: 0 mg
Please remember that these nutritional values for chutney are estimates and may vary based on the specific brands and quantities of ingredients you use. Enjoy your delicious chutney!
How to Store and Reheat Chutney
Proper chutney storage is key to enjoying your homemade creation for days to come. After all the effort you put into making it, you want to ensure it stays fresh and delicious! I always make a little extra chutney because it’s so versatile, so knowing how to store it properly is essential.
Once your freshly made chutney has cooled completely to room temperature, transfer it to an airtight container. I prefer glass jars, as they don’t absorb odors. You can safely store your homemade chutney in the refrigerator for up to 3-4 days. This keeps it vibrant and flavorful for everyday meals.
For longer chutney storage, you can freeze it! Portioned out into ice cube trays or small freezer-safe containers, chutney can be frozen for up to 3 months. When you’re ready to use it, simply thaw it overnight in the refrigerator. To reheat, I recommend gently warming it on the stovetop over low heat, or briefly in the microwave, stirring occasionally until heated through. This ensures your chutney retains its wonderful texture and taste.
Frequently Asked Questions About Chutney
Why is chutney popular?
Chutney is incredibly popular because of its amazing versatility and the burst of flavor it adds to almost any dish. It can be sweet, spicy, tangy, or a combination, offering a perfect complement to a wide range of cuisines. I think its ability to transform simple meals into exciting culinary experiences is why so many people, including myself, adore it.
What is the difference between chutney and relish?
While both chutney and relish are condiments made from fruits or vegetables, there’s a key distinction. Relish typically has a chunkier texture and is often more vinegary, focusing on a pickled taste. Chutney, on the other hand, is usually smoother, often blended, and features a complex profile of sweet, sour, and spicy notes, sometimes with a cooked-down, jam-like consistency. I find that chutney offers a richer, more nuanced flavor.
Can I use different fruits or vegetables to make a custom chutney?
Absolutely! That’s one of the best things about making homemade chutney. You can experiment with almost any fruit or vegetable. I’ve made fantastic chutney with apples, pineapples, and even bell peppers. Just remember to adjust the spices, sweetness, and acidity to balance the flavors of your chosen ingredients. Don’t be afraid to get creative with your own chutney creations!
How can I make my homemade chutney healthier?
Making your homemade chutney healthier is quite easy! I often reduce the amount of added sugar by letting the natural sweetness of fruits shine, or by using natural sweeteners like dates or jaggery sparingly. You can also boost the fiber content by adding more vegetables and herbs. Using minimal oil for tempering and focusing on fresh, unprocessed ingredients ensures your chutney is both delicious and a healthy addition to your meals.
Variations of Chutney You Can Try
One of the most exciting aspects of making homemade chutney is the endless possibilities for customization. I’ve discovered so many wonderful types of chutney by simply experimenting with different ingredients and flavors. Don’t feel limited to just one recipe; the world of chutney is vast and inviting!
For a sweet and tangy experience, try a classic fruit chutney like mango or apple. These are fantastic with cheeses or roasted meats. If you prefer something savory, a tomato chutney recipe with a hint of garlic and ginger is always a winner, especially with South Indian dishes. I also love to make a spicy green chutney using fresh mint and coriander, which is perfect for dunking samosas.
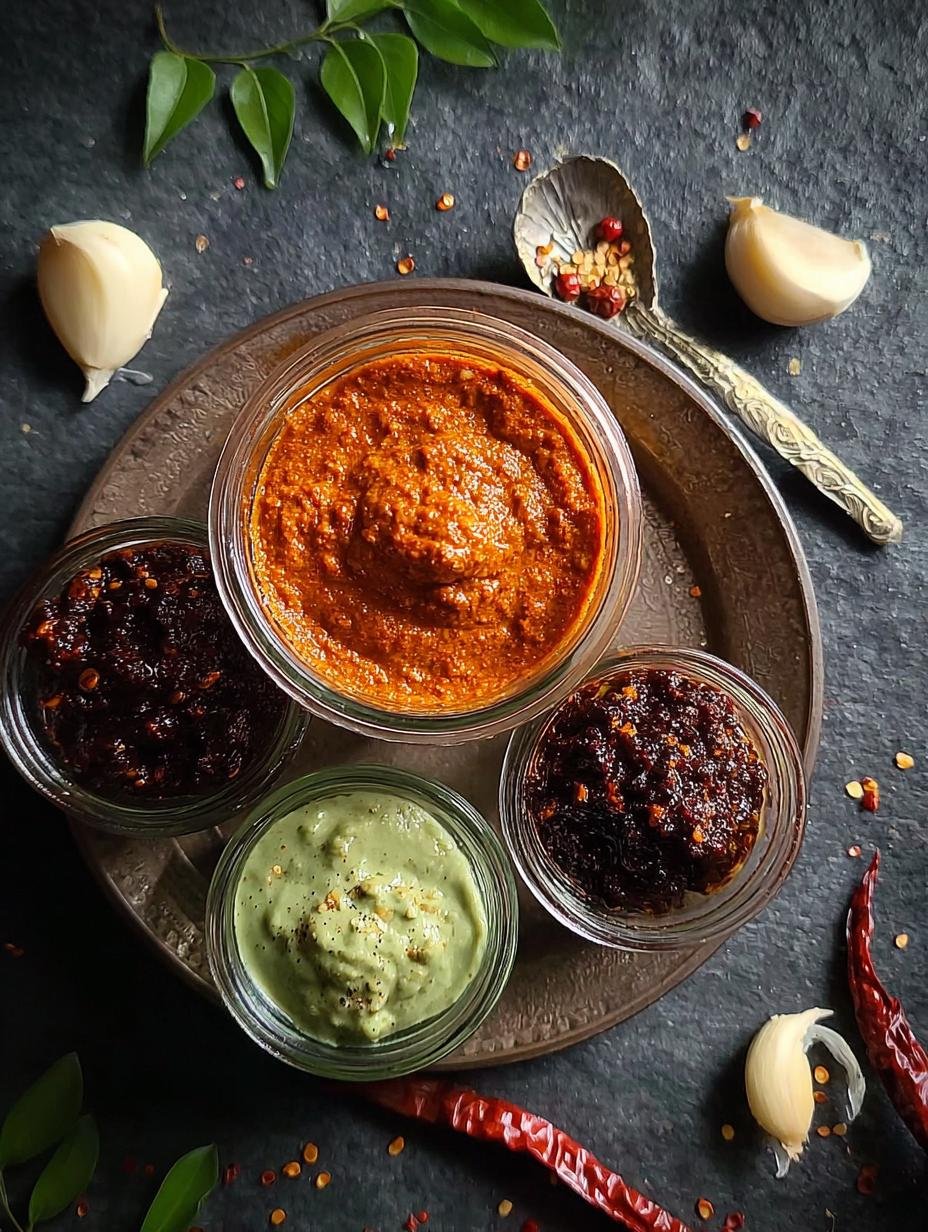
You can also explore dietary variations; for instance, creating a nut-free chutney by using seeds instead of peanuts. The beauty of chutney lies in its adaptability, allowing you to tailor it perfectly to your taste and what you have on hand. It’s truly a condiment that encourages creativity!
PrintChutney: 1 Amazing Way to Boost Your Meal Flavor
This recipe guide offers step-by-step instructions to prepare multiple variations of Indian-style chutneys, including coconut, coriander, tamarind, tomato-peanut, and garlic chutneys. Each chutney is blended to a smooth paste and finished with a flavorful tempering of mustard seeds, dry red chilies, and curry leaves, making these chutneys a perfect accompaniment to various Indian dishes.
- Prep Time: 10 minutes
- Cook Time: 15 minutes
- Total Time: 25 minutes
- Yield: 4 servings 1x
- Category: Condiment
- Method: Blending and tempering
- Cuisine: Indian
- Diet: Vegetarian
Ingredients
- 2/3 cup Coconut, grated
- 2 Green chilies
- 4 sprigs Cilantro or Coriander leaves
- 1/2 cup Water
- 1/4 tsp Salt
- 20 sprigs Coriander leaves or Cilantro
- 1/2 tsp Tamarind (or small ball)
- 1 tbsp Coriander seeds
- 4 Dry red chillies
- 6 Mint leaves
- 2 Garlic cloves
- 1 inch Ginger slice
- 1 tbsp Oil (preferably coconut oil)
- 1/2 tsp Cumin seeds
- 5 Dry red chilies
- 6 Garlic cloves, chopped roughly
- 1 tbsp Dalia or Hurigadale or Putani (cracked wheat or similar)
- 1/4 cup Peanuts or Groundnut
- 1/4 cup Coconut, grated or chopped
- 1 Tomato, cut into cubes
- 1/2 cup Water
- 1/4 tsp Garam masala powder
- 1/4 tsp Salt
- 1 tbsp Oil
- 1 tsp Mustard seeds
- 5 Curry leaves
- 1 Dry red chile, broken
Instructions
- Prepare the Chutney Base: In a mixie jar or blender, combine the grated coconut, green chilies, coriander leaves, tamarind (if applicable), coriander seeds, dry red chilies, mint leaves, garlic, ginger, water, and salt as per the chutney variation you’re making. Blend all ingredients until you achieve a smooth paste. Adjust water and salt according to taste.
- Make Tomato Peanut Chutney: Heat oil in a pan over medium heat. Add cumin seeds and allow them to splutter. Then add dry red chilies and chopped garlic; sauté for a few seconds until fragrant. Add dalia, peanuts, and roast on medium heat until golden and aromatic. Transfer this mixture along with grated coconut, chopped tomato, water, salt, and garam masala powder to the blender. Grind everything to a smooth paste.
- Prepare Tempering: In a small pan, heat oil over medium heat. When hot, add mustard seeds and wait for them to splutter. Then add broken dry red chili and curry leaves. Sauté for a few seconds to release flavors and immediately turn off the heat.
- Combine and Serve: Pour the prepared tempering over the blended chutney and mix well. Transfer to a serving bowl and serve fresh as an accompaniment to Indian meals like dosa, idli, rice, or snacks.
Notes
- You can adjust the level of spiciness by reducing or increasing the number of green chilies or dry red chilies.
- Use fresh and good quality grated coconut for the best flavor.
- Tamarind can be substituted with lemon juice if unavailable, but this will alter the taste slightly.
- The tempering step is essential for enhancing the aroma and flavor of all chutneys.
- Store leftover chutney in an airtight container in the refrigerator for up to 2 days.
- For a vegan option, ensure the oil used is plant-based, such as coconut or vegetable oil.
Nutrition
- Serving Size: 2 tablespoons
- Calories: 70 kcal
- Sugar: 2 g
- Sodium: 150 mg
- Fat: 5 g
- Saturated Fat: 3.5 g
- Unsaturated Fat: 1.5 g
- Trans Fat: 0 g
- Carbohydrates: 6 g
- Fiber: 2 g
- Protein: 1.5 g
- Cholesterol: 0 mg


Leave a Reply