Halloween Cookies have always been my absolute favorite part of the spooky season! There’s just something magical about transforming simple dough into fun, festive treats that bring smiles to everyone’s faces. I still remember my mom and I spending hours in the kitchen, covered in flour and sprinkles, creating our first batch of Halloween sugar cookies. The smell of vanilla and almond filling the air, the joy of cutting out ghost and pumpkin shapes – it’s a memory I cherish. If you’ve ever wondered how to make Halloween cookies that wow your friends and family, you’ve come to the right place. Let’s get baking!
Why You’ll Love These Halloween Cookies
These aren’t just any cookies; they’re a gateway to pure holiday fun! Here’s why you’ll adore them:
- Deliciously Sweet: They boast a perfect balance of sweet and buttery flavors that everyone raves about.
- Quick to Prepare: With a prep time of just 30 minutes, these are truly easy Halloween cookies for busy schedules.
- Family Fun: They’re incredibly family-friendly, making them ideal for baking with kids of all ages.
- Budget-Friendly: Using common pantry staples, these cookies are an affordable way to celebrate the season.
- Versatile Decorating: From spooky to cute, the decorating possibilities are endless, making them some of the most fun cookie designs.
- Customizable Taste: Easily adapt the flavors with different extracts or spices.
- Kid-Approved: These are some of the best Halloween cookies to bake for little ones, especially when they get to help decorate!
- Effortlessly Easy: You’ll find these easy Halloween cookies a breeze to whip up, even for beginner bakers.
Ingredients for Halloween Cookies
Gathering your ingredients is the first exciting step to creating these festive treats. You’ll need the basics for a perfect sugar cookie dough, plus a few extras for that signature Halloween flair. Using Halloween cookie cutters is key to getting those iconic shapes, so have them ready!
- 2 ½ cups all-purpose flour – the base for our cookies
- 1 teaspoon baking powder – helps them puff up just right
- ½ teaspoon baking soda – for a tender crumb
- ¼ teaspoon salt – balances the sweetness
- 1 cup unsalted butter, softened – crucial for a creamy dough and rich flavor
- 1 ½ cups granulated sugar – provides sweetness and structure
- 1 large egg – binds everything together
- 2 teaspoons vanilla extract – for that classic, comforting cookie aroma and taste
- 1 teaspoon almond extract (optional) – adds a delightful depth and complexity
- Food coloring (various colors for decoration) – essential for bringing your spooky designs to life
- Cookie sprinkles (Halloween themed) – for that extra sparkle and fun
- Royal icing (for decorating) – the perfect canvas for your creative Halloween cookie decorating ideas
How to Make Halloween Cookies
Let’s get this spooky baking party started! Following these steps will help you create some of the most memorable Halloween cookies. The aroma of baking sugar cookies is truly one of the best parts of the season!
- Step 1: Preheat your oven to 350°F (175°C). Make sure to line your baking sheets with parchment paper. This prevents sticking and makes cleanup a breeze.
- Step 2: In a medium bowl, whisk together the 2 ½ cups all-purpose flour, 1 teaspoon baking powder, ½ teaspoon baking soda, and ¼ teaspoon salt. Set this dry mixture aside.
- Step 3: In a large bowl, cream together 1 cup unsalted butter, softened and 1 ½ cups granulated sugar until the mixture is light, fluffy, and pale yellow. This creaming step is key for the cookie’s texture.
- Step 4: Beat in 1 large egg, 2 teaspoons vanilla extract, and the optional 1 teaspoon almond extract until everything is just combined and smooth.
- Step 5: Gradually add the dry ingredients from Step 2 into the wet ingredients from Step 4. Mix on low speed or stir with a spatula until a soft dough forms. Don’t overmix!
- Step 6: Divide the dough in half, flatten each half into a disc, wrap them tightly in plastic wrap, and chill in the refrigerator for at least 30 minutes. This makes the dough easier to handle.
- Step 7: Once chilled, lightly flour your work surface and your rolling pin. Roll out one disc of dough to about ¼-inch thickness. This thickness is perfect for creating sturdy, yet tender cookies.
- Step 8: Use your favorite Halloween cookie cutters to cut out fun shapes like ghosts, pumpkins, bats, and cats. Place the cutouts onto your prepared baking sheets, leaving a little space between them. These shapes are central to many spooky Halloween cookie ideas.
- Step 9: Bake in the preheated oven for 10-12 minutes, or until the edges are just beginning to turn lightly golden. Keep an eye on them, as bake times can vary.
- Step 10: Let the cookies cool on the baking sheets for about 5 minutes. This allows them to firm up slightly before you move them. Then, carefully transfer them to wire racks to cool completely.
- Step 11: Once the cookies are entirely cool, it’s time for the fun part: decorating! Use royal icing, food coloring, and Halloween-themed sprinkles to bring your spooky Halloween cookie ideas to life. This is where your creativity shines for some truly unique decorated Halloween cookies.
Pro Tips for the Best Halloween Cookies
Want to elevate your cookie game? These tips will ensure your homemade Halloween cookies are a smashing success:
- Chill is Key: Always chill your dough as directed. Cold dough is less likely to spread in the oven, helping your shapes stay crisp and defined.
- Don’t Overmix: Overmixing the dough can develop the gluten too much, resulting in tough cookies. Mix until just combined for a tender bite.
- Even Thickness: Use a rolling pin with guides or measure your dough thickness to ensure cookies bake evenly. About ¼-inch is perfect for this recipe.
- Cool Completely Before Decorating: Patience is a virtue! Make sure your cookies are totally cool before applying icing. Warm cookies will melt your beautiful designs.
What’s the secret to perfect Halloween Cookies?
The secret lies in the dough’s chill time and not overmixing. This ensures your cookies hold their shape beautifully, making them ideal for intricate decorated Halloween cookies. Plus, the combination of vanilla and almond extracts provides a subtle, delicious flavor. For more baking tips, you can check out our baking philosophy.
Can I make Halloween Cookies ahead of time?
Yes! You can wrap the unbaked cookie dough tightly in plastic wrap and store it in the refrigerator for up to 3 days. You can also freeze the dough discs for up to 3 months. Just thaw in the fridge before rolling and cutting. For more information on food safety and storage, consult FoodSafety.gov.
How do I avoid common mistakes with Halloween Cookies?
A common pitfall is dough spreading too much; ensure it’s well-chilled. Another mistake is overbaking, which leads to dry cookies; watch for lightly golden edges. Finally, don’t rush the cooling process before decorating; warm cookies ruin icing designs. If you’re interested in the science behind baking, you might find this article helpful.
Best Ways to Serve Halloween Cookies
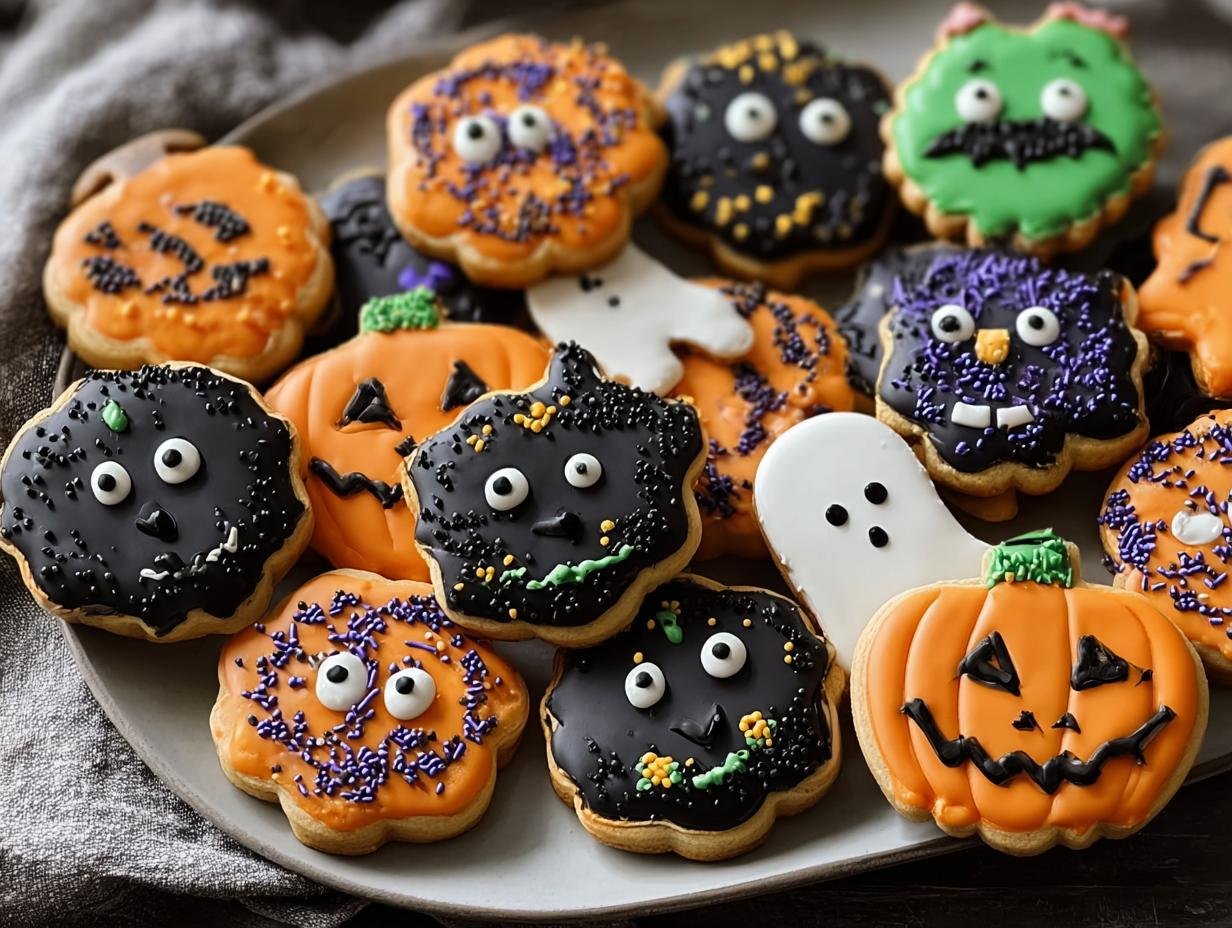
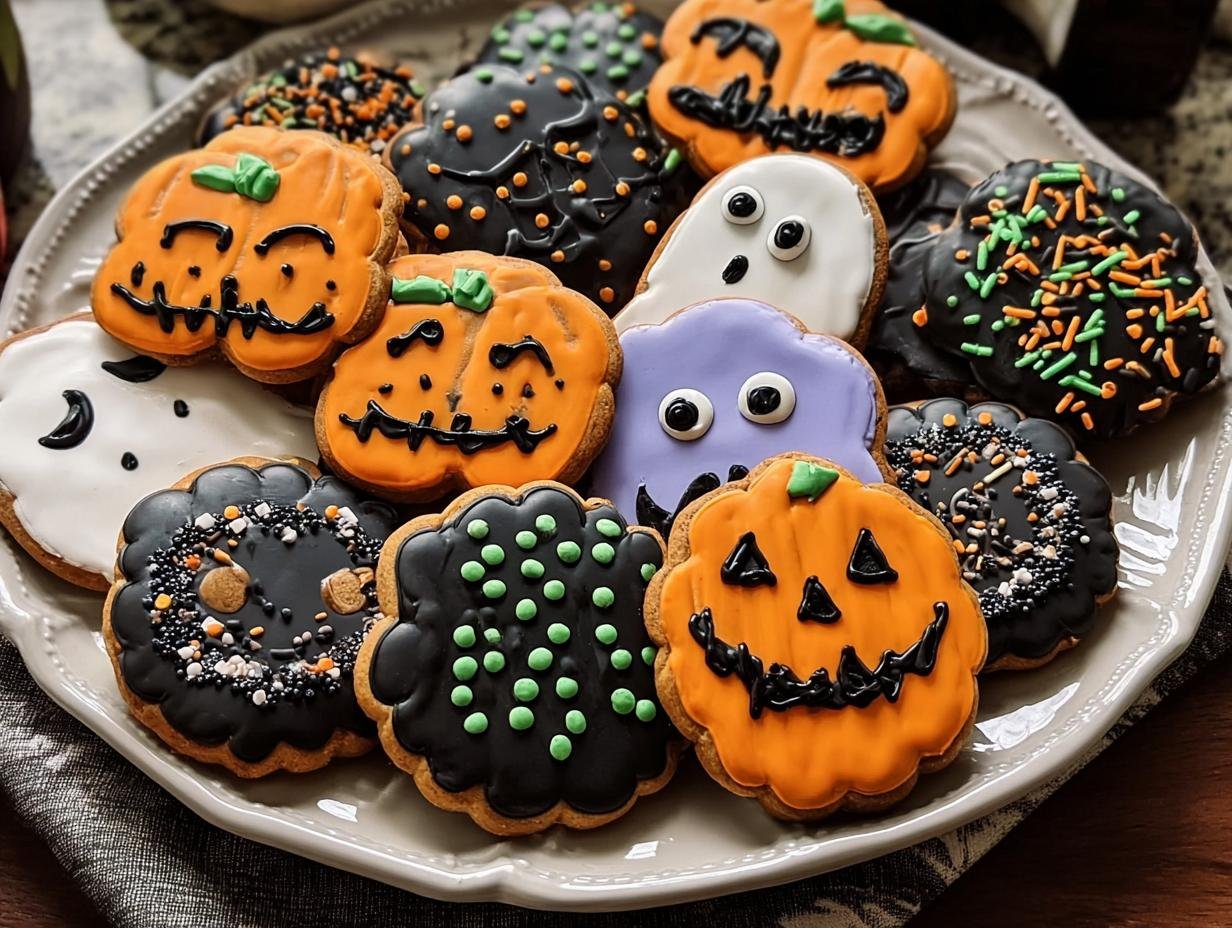
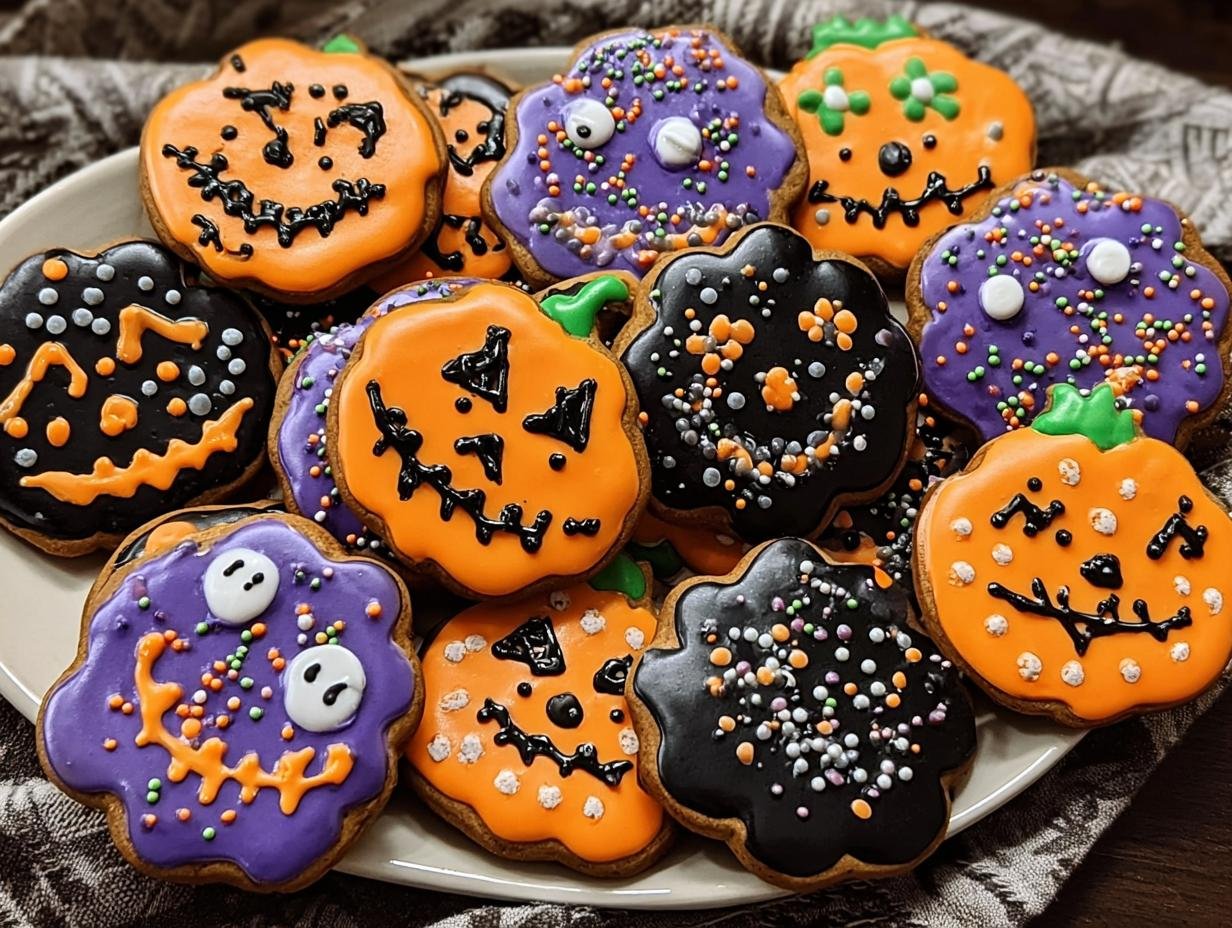
Once your spooky creations are perfectly decorated, it’s time to showcase them! These Halloween cookies are fantastic on their own, but they also pair wonderfully with a cold glass of milk or a warm mug of apple cider, especially on a chilly autumn evening. For parties, arrange a colorful platter of ghost, pumpkin, and bat cookies – the visual appeal alone is a treat. You can also incorporate them into a larger dessert spread alongside Halloween cupcakes or candy. Don’t forget to explore different Halloween cookie decorating ideas to create themed cookie platters that are as delightful to look at as they are to eat! You can find more baking inspiration here.
Nutrition Facts for Halloween Cookies
These festive treats are as fun to eat as they are to make. Here’s a breakdown of what you can expect per cookie, though keep in mind that decorations can slightly alter these numbers.
- Calories: Approximately 150-200 (varies with decoration)
- Fat: Approximately 8-10g
- Saturated Fat: Approximately 5-6g
- Protein: Approximately 2g
- Carbohydrates: Approximately 20-25g
- Fiber: Approximately 1g
- Sugar: Approximately 15-20g
- Sodium: Approximately 50mg
Nutritional values are estimates and may vary based on specific ingredients used and the amount of decoration applied to your Halloween cookies. For more details on nutritional information, please see our disclaimer.
How to Store and Reheat Halloween Cookies
Proper storage is key to keeping your homemade Halloween cookies fresh and festive, especially if you’re preparing them for events or for little ones who love to snack. Once your beautifully decorated cookies have completely cooled on wire racks, it’s time to store them. For short-term storage, place them in an airtight container with wax paper or parchment paper between layers to prevent the decorations from smudging. They’ll stay delicious in the fridge for about 3 to 4 days. If you’re planning ahead for parties or want to save some for later, these cookies freeze wonderfully! Wrap them well in plastic wrap, then in foil, and store them in the freezer for up to 3 months. This makes them perfect for when you need a quick treat, like for after-school snacks using your favorite Halloween cookie recipes for kids. For more storage tips, check out our contact page for advice.
When you’re ready to enjoy your frozen treats, thaw them overnight in the refrigerator. If you want to serve them warm, you can gently reheat them in a low oven (around 300°F or 150°C) for just a few minutes until they are slightly warmed through. Be careful not to overheat them, as this can cause the icing to melt.
Frequently Asked Questions About Halloween Cookies
What are the most popular Halloween cookie designs?
The most popular Halloween cookies often feature classic spooky motifs like ghosts, pumpkins, bats, and spiders. Many people love simple Halloween sugar cookies cut into these shapes and decorated with basic icing. However, you’ll also find a huge trend towards more elaborate and cute Halloween cookie designs, like friendly monster faces or witch hats.
Can I use store-bought cookie dough for Halloween cookies?
Absolutely! While homemade dough is wonderful, using store-bought cookie dough is a fantastic shortcut for easy Halloween cookies. Just make sure to chill it thoroughly before cutting your shapes, especially if you’re aiming for intricate designs. It’s a great way to save time while still creating fun, festive treats. You can find more information on our privacy policy regarding ingredient usage.
What’s the best way to get clean edges on my Halloween cookie cutouts?
To achieve crisp edges on your Halloween cookie cutouts, ensure your dough is well-chilled before rolling and cutting. Roll the dough evenly to about ¼-inch thickness. When cutting, press straight down firmly with your Halloween cookie cutters and lift straight up. Re-chilling the cutouts on the baking sheet for 10-15 minutes before baking can also help them maintain their shape.
How can I make my Halloween cookies look more professional?
For a more professional look, focus on consistent dough thickness and precise cutting. When decorating, practice flood icing techniques for smooth, even surfaces, and then add details like eyes or patterns once the base layer is dry. Experimenting with different piping tips for fine lines or dots can also elevate your cute Halloween cookie designs and make them truly stand out.
Variations of Halloween Cookies You Can Try
Once you’ve mastered the basics, there are so many fun ways to get creative with your Halloween baking! These variations offer something for everyone, whether you have dietary needs or just want to explore new flavors. They’re fantastic creative Halloween cookie ideas to personalize your holiday treats.
- Gluten-Free Halloween Sugar Cookies: Simply swap out the all-purpose flour for a good quality gluten-free all-purpose baking blend. You might need to add a touch more liquid if the dough seems dry, but otherwise, the process is identical for these delicious gluten-free Halloween cookies.
- Spiced Pumpkin Flavor: Infuse your dough with fall flavors by adding 1 teaspoon of pumpkin pie spice and ¼ cup of pumpkin puree to the wet ingredients. This gives your cookies a lovely seasonal taste and a slightly softer texture, perfect for creating pumpkin-shaped treats.
- Chocolate Halloween Cookies: For a richer flavor, substitute ¼ cup of the all-purpose flour with unsweetened cocoa powder. You can also add chocolate chips or drizzle melted chocolate over your cooled cookies for an extra decadent touch.
- No-Bake Halloween Treats: If you’re short on oven time or want a simpler option, consider no-bake alternatives like cereal treats molded into spooky shapes or “cricket” cookies made with dates and nuts. These are super quick and always a hit with younger bakers.
Spooky Halloween Cookies: 10 Minutes to Yum

These Halloween Cookies are a fun and festive way to celebrate the holiday. Easy to customize with various spooky shapes and delicious flavors, they are perfect for parties, school events, or simply enjoying the season. This guide provides simple steps to create these edible works of art, making them a cherished family tradition.
- Prep Time: 30 minutes
- Cook Time: 10-12 minutes per batch
- Total Time: 1 hour
- Yield: Varies based on cookie cutter size
- Category: Dessert
- Method: Baking
- Cuisine: American
- Diet: Vegetarian
Ingredients
- 2 ½ cups all-purpose flour
- 1 teaspoon baking powder
- ½ teaspoon baking soda
- ¼ teaspoon salt
- 1 cup unsalted butter, softened
- 1 ½ cups granulated sugar
- 1 large egg
- 2 teaspoons vanilla extract
- 1 teaspoon almond extract (optional)
- Food coloring (various colors for decoration)
- Cookie sprinkles (Halloween themed)
- Royal icing (for decorating)
Instructions
- Preheat your oven to 350°F (175°C). Line baking sheets with parchment paper.
- In a bowl, whisk together the flour, baking powder, baking soda, and salt. Set aside.
- In a separate large bowl, beat the softened butter and granulated sugar together until creamy and light.
- Add the egg, vanilla extract, and almond extract. Mix until well combined.
- Gradually add the dry ingredients to the wet ingredients. Stir until a dough forms.
- Wrap the dough in plastic wrap and chill in the refrigerator for at least 30 minutes.
- On a lightly floured surface, roll out the chilled dough to about ¼-inch thickness.
- Use cookie cutters to cut out your desired shapes and place them on the prepared baking sheets.
- Bake in the preheated oven for 10-12 minutes or until edges are lightly golden.
- Remove from the oven and let cool on the baking sheets for 5 minutes before transferring to wire racks to cool completely.
- Once completely cooled, use royal icing and food coloring to decorate the cookies. Add sprinkles and let the designs set.
Notes
- Experiment with different food coloring for vibrant cookies.
- Leftover dough can be refrigerated for later use.
- Adjust cookie thickness for desired texture.
- Use sprinkles before baking for added sparkle.
Nutrition
- Serving Size: 1 cookie
- Calories: Approximately 150-200 (varies with decoration)
- Sugar: Approximately 15-20g
- Sodium: Approximately 50mg
- Fat: Approximately 8-10g
- Saturated Fat: Approximately 5-6g
- Unsaturated Fat: Approximately 3-4g
- Trans Fat: 0g
- Carbohydrates: Approximately 20-25g
- Fiber: Approximately 1g
- Protein: Approximately 2g
- Cholesterol: Approximately 25mg


Leave a Reply